How to Build a Kitchen Table: Quick Steps
Building a kitchen table from scratch is a rewarding project that combines craftsmanship with functionality. Whether you’re a beginner or an experienced woodworker, creating your own kitchen table allows you to customize the size, style, and materials to perfectly fit your space and aesthetic. With the right planning, tools, and techniques, you can construct a durable, beautiful centerpiece for family meals and gatherings.
This guide walks you through every phase of building a solid-wood kitchen table, covering standard dimensions, material selection, joinery methods, base construction, and finishing. You’ll learn how to avoid common pitfalls like warping, wobbling, and unsightly gaps while ensuring professional-level results.
Plan Your Kitchen Table Dimensions and Style
Choose the Right Height and Width
The ideal kitchen table height is 30 to 31 inches, matching standard dining chairs for comfortable seating without strain. For width, aim for 36 to 42 inches, with 40 inches being ideal for two people to sit across comfortably. Length depends on your space and seating needs.
Consider these standard lengths:
• 48 inches seats 4 people
• 72 inches seats 6 people
• 84 to 120 inches seats 8 to 10 people
A common configuration is 30.5 inches high by 40 inches wide by 84 inches long, which comfortably seats up to 10 people.
Position Legs for Maximum Clearance
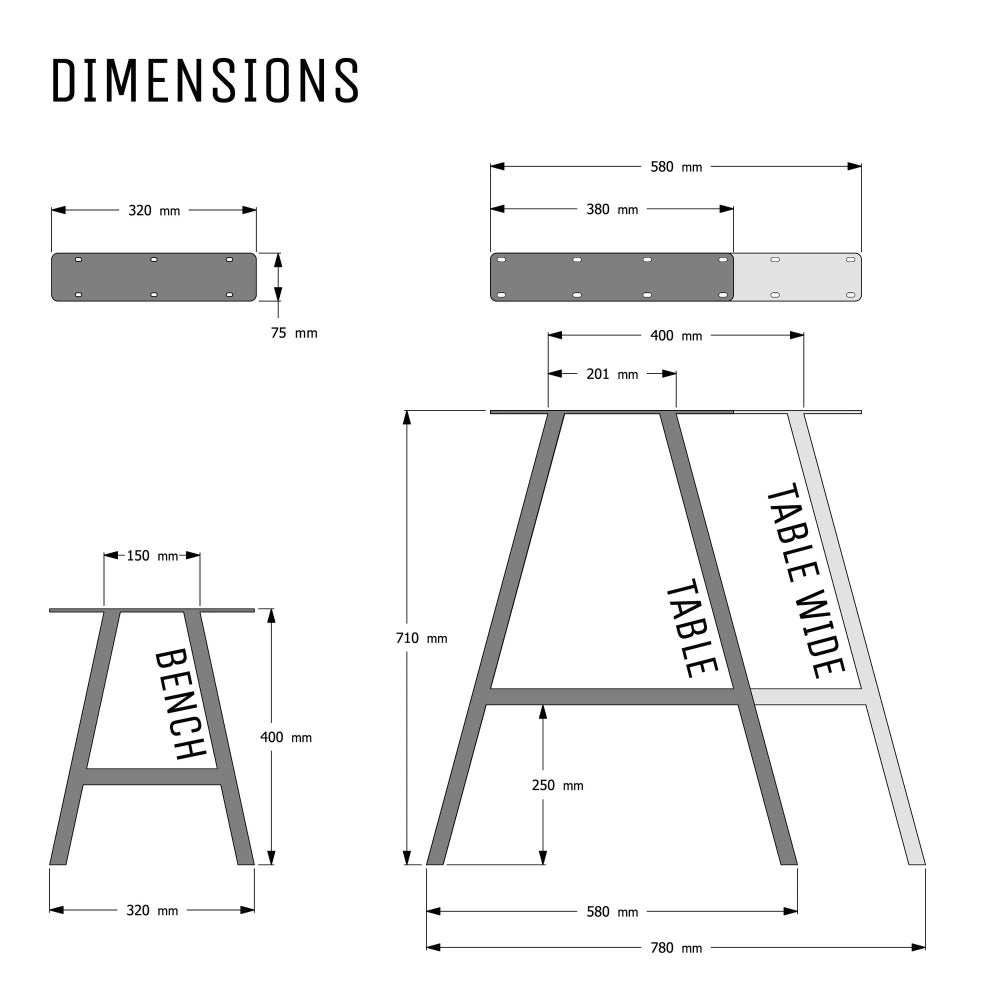
Inset legs 12 inches from each end to allow full chair access. Use tapered or V-shaped legs along the long sides to improve knee room. For a vintage look, consider 5-inch square legs; for modern style, use slender 4×4 posts or metal legs.
Match Your Style Preference
Decide early between rustic or refined aesthetics. Rustic tables use reclaimed wood with visible gaps and natural imperfections, which actually help hide flaws. Smooth modern tables require flawless wood and precise joinery for a clean finish. Custom sizes are easy to achieve by building the tabletop first, then crafting the base to fit.
Select and Prepare the Right Lumber
Pick the Best Wood Species
Choose based on durability and appearance. White oak (quarter-sawn) offers the best heirloom quality, resists warping, and shows striking ray fleck grain. Walnut provides a rich, dark tone with natural variation, though staining helps prevent UV fading of sapwood. Maple, cherry, and red oak are solid alternatives with similar workability. Pine or rubberwood work well for budget builds and painted finishes.
Only use kiln-dried lumber to prevent shrinkage and warping. Green or air-dried wood will cause problems down the line.
Sort and Cut Boards Strategically
Select the flattest, best-grained boards for the tabletop. For the base, use slightly bowed or twisted pieces where visual perfection matters less. Use 10-inch-wide boards when possible to reduce seam count and minimize spill-prone gaps. Cut all boards 6 inches longer than the final length to account for snipe, defects, and milling errors.
Mill Lumber in the Correct Sequence
Follow this sequence for flat, stable stock. First, rough cut on a band saw. Second, joint one face flat. Third, plane the opposite side using the jointed face down (mark it with pencil). Fourth, joint edges square, applying even pressure at the fence. Fifth, rip to final width on a table saw.
Use shallow planer cuts of 1/16 inch to avoid strain. Wax the bed if boards drag. Trim snipe from ends after planing.
Build a Flat, Stable Tabletop

Arrange Boards for Maximum Stability
Alternate grain direction to counteract cupping. Flip each board so growth rings face opposite directions. This happy/sad face pattern balances internal stress and prevents warping. Balance color by placing darker boards toward edges and lighter ones in the center, or create a flowing gradient.
Choose a Strong Joinery Method
Select one of these proven techniques. Domino joinery uses loose tenons inserted every 12 to 16 inches, set to 3/4 inch depth for 1.5-inch stock. Place the first domino 1/4 inch from the edge. Biscuit joinery aligns seams with biscuits, cleaning tear-out with a chisel. Pocket holes require drilling 1.5-inch holes in ends and one edge (except the last board), using 2.5-inch screws and face clamps to pull planks flush.
Glue Up the Top Properly
Use Titebond Original for its stiffness, which prevents ridges under the finish. Avoid Titebond II or III, which can cause texture issues. Apply glue, clamp every 12 to 16 inches, and use cauls to prevent bowing. Clamp overnight for a secure bond.
For rustic tables, leave 1/8-inch gaps (butter knife width) between boards. This prevents crumb traps while stopping spills. Gaps smaller than this are hard to clean, while larger ones risk damage.
Add Breadboard Ends
Attach breadboard ends to prevent cupping and improve appearance. Use pocket holes from underneath, screwing into the breadboard. Miter corners for a decorative touch.
Construct a Strong Table Base
Choose Between A-Frame or Leg-and-Apron
The A-frame base provides structural elegance. Cut legs at 80-degree angles (10 degrees from vertical). Mark leg length at 27.5 inches, adding 3 inches for top thickness to hit 30.5 inches final height. Upper stretchers bevel at 45 degrees. The lower brace uses two 2×2s glued together for 3×3 inch double thickness, notched to cradle the stretcher.
The leg-and-apron (farmhouse) style uses 4×4 legs or purchased turned legs (5 inches square, 29 inches tall). Aprons are 2×6 boards connecting legs. Add runner supports under legs with pocket holes down. Install a central runner between supports for rigidity.
Use Strong Joinery for the Frame
For domino joinery, use four dominoes in leg tops and three in rail undersides. Dry-fit before gluing. For pocket hole joinery, drill 1.5-inch pocket holes in apron ends and attach to legs with 2.5-inch screws and glue. Attach runner supports to leg bottoms, then secure the central runner from below.
Reinforce with Rabbet Joints
For A-frames, cut three 2-inch by 3/4-inch rabbets in upper stretchers. Insert 2×1-inch beveled strips with 1/4-inch rabbets on ends. This increases glue surface and improves tabletop contact, reducing warping risk.
Shape, Sand, and Prep the Surfaces
Round Over Edges and Ends
For a timeless look, shape subtle curves on table ends. Use a 1-inch rise jig to mark a soft arc. Cut slightly outside the line with a jigsaw. Clean up with a flush-trimming router bit.
Apply edge profiles. Use 3/8-inch roundover on corners and 1/8-inch roundover on edges. Alternatively, hand-break all sharp edges for a refined, safe feel.
Sand in the Proper Grit Sequence
Progress through grits for a smooth, flat surface. Start with 80 grit to remove mill marks and glue. Move to 120 grit to smooth out scratches. Finish at 180 grit for oil finishes or 220 grit for polyurethane.
Use a hard-backed sanding pad for even pressure. Lift the sander straight up to avoid swirls. Vacuum dust between grits. Sand the bottom to at least 120 grit before attaching the base.
Fill Voids and Imperfections
After glue-up, fill knots and voids with dark brown epoxy. Use a blowtorch to pop bubbles. Fill tiny holes with CA glue and activator for instant curing without shrinkage. Cover pocket holes on the underside with wood filler if not hidden by aprons.
Apply a Durable Finish
Stain for Color and Protection
For walnut, apply oil-based wipe-on stain (Dark Walnut) to prevent UV fading. Wipe on, wait 5 minutes, then wipe off with grain.
For a rustic aged look, apply white wash pickling stain first, wait 5 minutes, wipe off. Once dry, apply rustic brown stain over top for a weathered tone. For farmhouse style, use honey stain for a warm, natural base.
Choose the Right Topcoat
Hard wax oil (like Osmo) provides two coats, enhances grain, and is food-safe. It ages gracefully and allows easy spot repairs. Shellac seals wood and adds a soft glow, working well over honey stain without a plastic feel.
Polyurethane offers the highest durability for busy families. Use high-solids spray poly (50 percent or higher solids) for professional results, or Varathane Triple Thick Satin for brush-on application. Avoid polyacrylic, which looks plasticky and scratches easily.
Attach the Top and Complete Assembly
Use Threaded Inserts for Flexible Mounting
Prefer threaded inserts over direct screws for wood movement and future disassembly. Install 1/4-inch by 3/4-inch inserts in the tabletop underside, aligned with aprons. Drill a 10.5mm (13/32-inch) pilot hole and countersink for the flange. Vacuum dust, add CA glue to threads, and drive in with a drill. Do not over-tighten.
Connect the base with 1-inch coarse-thread bolts and washers.
Or Use Direct Screws for Simplicity
Flip the tabletop upside down, position the base, and drive 2.5-inch wood screws from the apron into the tabletop. Ensure screws don’t penetrate the top surface.
Add Adjustable Feet
Install screw-in adjustable feet on leg bottoms to level the table on uneven floors and eliminate wobble.
Assemble On-Site for Large Tables
For large tables, build the top and base separately. Transport into the room, then attach. This avoids struggling through doorways.
Test Stability and Maintain Your Table
Check for Wobble and Level
Test for wobble after assembly. Adjust feet or sand high spots. The double-thick stretcher and domino joinery in A-frames prevent flexing under load.
Follow Long-Term Care Tips
Clean with a damp cloth only, avoiding harsh chemicals. Reapply oil finish annually or as needed. Repair dents in oil-finished tables by steaming or spot-sanding. Poly tables may need full refinishing if damaged.
Customize for Your Space
DIY building lets you create exact-fit tables perfect for tight spaces between walls or under windows. A 10-seat farmhouse table with central runner supports heavy holiday gatherings. For small kitchens, a 4-foot round table with a compact base maximizes seating.
Frequently Asked Questions About Building a Kitchen Table
What is the standard height for a kitchen table?
The standard kitchen table height is 30 to 31 inches. This matches standard dining chairs and ensures comfortable seating without strain.
Which wood is best for building a kitchen table?
White oak (quarter-sawn) is best for heirloom-quality tables, offering excellent warping resistance and striking grain. Walnut provides rich color but needs stain to prevent UV fading. Maple, cherry, and red oak are solid alternatives.
How do I prevent my tabletop from warping?
Alternate grain direction when arranging boards (happy/sad face pattern). Use kiln-dried lumber only. Apply breadboard ends to prevent cupping. Allow for wood movement when attaching the top to the base.
Should I use pocket holes or domino joinery?
Pocket holes work well for beginners and provide strong joints with proper screws. Domino joinery offers a more refined appearance and is stronger for heavy-use tables but requires specialized equipment.
How long does it take to build a kitchen table?
A first-time builder typically needs one to two weekends for a basic build. Experienced woodworkers can complete a table in a long weekend. Drying time between stages (glue, finish) adds additional days.
What gap size should I leave between tabletop boards?
Leave 1/8-inch gaps (butter knife width) for rustic tables. This prevents crumbs from getting trapped while stopping spills from reaching the floor. Tight gaps are harder to clean.
Key Takeaways for Building a Durable Kitchen Table
Building a kitchen table is more than a project; it creates a legacy piece for your home. Start with precise milling using kiln-dried lumber, and always alternate grain direction on the tabletop to resist warping. Choose the right joinery method for your skill level, whether pocket holes for beginners or domino joinery for advanced builders.
Apply the appropriate finish for your lifestyle. Hard wax oil provides natural beauty and easy repairs, while polyurethane offers maximum protection against spills and heat. Use threaded inserts for attaching the top to allow for wood movement and future disassembly.
With quarter-sawn oak, proper joinery, and a food-safe finish, your table can last 100 years or more. Whether you choose rustic charm or modern minimalism, this guide gives you the skills to build a functional, beautiful centerpiece. Start with precise dimensions, master the glue-up, and finish with confidence.