How to Draw a Dining Room Table
Drawing a dining room table may seem challenging at first, but with the right approach, anyone can create a realistic and visually compelling illustration. Whether you’re sketching for a design project, practicing perspective, or building foundational drawing skills, mastering this common piece of furniture teaches essential techniques in form, proportion, and spatial depth. The key lies in breaking down the complex structure into simple geometric shapes, ellipses, rectangles, and curves, and applying consistent perspective and shading.
This guide walks you through a step-by-step process to draw a dining room table confidently, covering both round pedestal and multi-leg designs. You will learn how to construct accurate proportions, define depth with line weight, and add realism through shadows and highlights. By the end, you will have a clean, professional-looking sketch that appears grounded and three-dimensional.
Drawing the Tabletop with Accurate Perspective
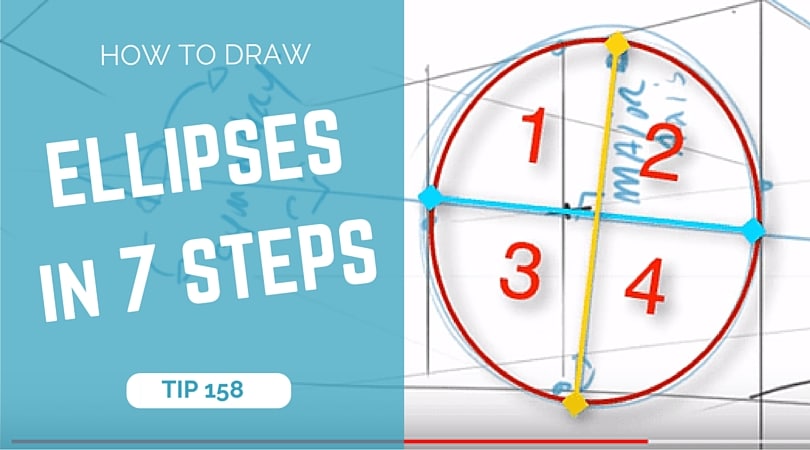
The foundation of any dining table drawing is the tabletop. Getting this shape right sets the tone for the entire illustration. Start by sketching a smooth ellipse to represent the circular top viewed from an angle. This ellipse should be slightly flattened to accurately suggest perspective, with the degree of flattening correlating to your eye level relative to the table.
Creating the Tabletop Ellipse
Place the ellipse near the top third of your page to allow space for legs and shadows below. Use light pencil strokes so adjustments are easy. Find the center by drawing two faint intersecting lines, one vertical and one horizontal. This cross marks your central axis, which is critical for aligning the base. The flatter the ellipse, the lower the viewer is eye level, imagining looking across the table rather than down on it.
Adding Tabletop Thickness
A flat shape looks like a disc, not a table. To add volume, draw a second, smaller ellipse slightly beneath and inside the first. The gap between the two ellipses represents the edge of the tabletop. Connect the outer and inner ellipses with short vertical lines at the front and back where visible. This reveals the underside of the table and gives it physical presence. The visible portion depends on your viewing angle, more underside is seen from eye level, less from above.
For a subtle overhang effect, extend the top ellipse slightly beyond the lower one, then draw a soft curve connecting them. This mimics how real tables often have a lip or rounded edge. For rectangular tables, add a light outline around the edges of the initial shape to indicate slight thickness.
Building the Support Structure
Dining tables typically use either a central pedestal or multiple legs. Each has distinct construction rules that create different visual styles.
Constructing a Central Pedestal Base

Pedestal tables are ideal for beginners because they minimize perspective complexity with a single central support. From the center of your tabletop ellipse, drop a straight vertical line downward. This is your structural spine. Its length should be roughly 2.5 to 3 times the height of the tabletop edge.
Using curved lines, form a smooth, flowing column that narrows slightly as it descends. Think of it as a curved, inverted teardrop, wider at the top where it meets the table, then gently tapering toward the base. Keep the curves symmetrical on both sides of the central axis. The column should feel weighty and balanced, not spindly or uneven.
At the bottom, draw a wider ellipse to represent the base of the pedestal. This grounding element should be broader than the column bottom to suggest stability. Connect the column to the base with a horizontal band or ring. Finish with a curved plate or circular foot beneath the base ellipse to prevent the table from looking like it is floating.
Sketching a Three-Leg Design

For traditional or modern tables, three legs offer symmetry and visual interest while maintaining manageable perspective. Draw a thick, tapered rectangle extending straight down from the center or slightly behind the tabletop center. Round the edges slightly to match a natural wood or modern design. The leg should be wider at the top and narrow toward the floor, suggesting depth and material thickness.
Draw the two outer legs angling outward and backward. These must recede into space, not parallel, to create depth. Use converging lines that move away from the viewer. Each leg is a thick, tapered rectangle with rounded corners. The farther leg should show a slight reveal beneath the tabletop, indicating it is attached behind the front plane.
In classic designs, the legs may flow from a single curved base that arcs down from the tabletop edges and meets at the center. Start two curved lines from the underside of the tabletop, sweeping outward and down, then curving inward to meet at a central foot. Add small rounded balls at the ends for feet and a horizontal line connecting them to reinforce stability.
Refining Your Line Work and Inking
Now that the structure is in place, refine your sketch into a polished drawing using consistent line weight and proper inking technique.
Applying Consistent Line Weight
Use heavier lines for outer edges and lighter ones for internal details. This creates visual hierarchy, thicker lines make the table appear solid and grounded. Where parts overlap, like the tabletop over the legs, draw the top layer with a continuous, unbroken line. This signals which object is in front. Thicker lines are generally used for the outer contours while thinner lines may define internal details or texture.
Inking the Final Outline
Choose a fine or medium-tip pen for clean, controlled lines. Micron, Copic, or brush pens work well depending on your style. Go over your pencil sketch with smooth, deliberate strokes. Pause briefly at corners or tight curves to maintain control. Let the ink dry completely before erasing. This step is crucial to prevent smudging.
Use a soft, non-abrasive eraser to remove construction lines. Gently lift the pencil marks without smudging the ink. Remove all center lines, ellipses, and alignment guides for a clean, professional finish. Complete removal of construction lines is essential for a polished final product.
Adding Realistic Shading and Shadows

Shading brings your table to life, anchoring it in space and defining its material properties.
Creating Floor Shadows
Without a shadow, your table will look like it is hovering. Draw a soft, elongated oval beneath the base or legs to simulate contact with the floor. Make the shadow darker directly under the table and fade it outward. If the light source is from the top left, the shadow should extend to the bottom right.
Add subtle shading on the sides where the legs or pedestal connect to the tabletop. This defines the junction point and adds depth to the joinery. A small shadow under the base or feet helps ground the structure visually.
Highlighting Reflective Surfaces
If the table has a glossy finish, add a bright highlight along the top front edge. Use a soft gradient across the tabletop surface, fading from light to dark based on the curve. Reflect subtle light on the upper part of the pedestal or legs. For matte finishes, use even, soft shading without sharp highlights.
Shade the inner curve of the column and the joint between the table and pedestal to create volume. The shading should follow the curvature of the form to emphasize its roundness.
Professional Tips and Final Touches

Now that the core drawing is complete, apply finishing touches that elevate realism and ensure technical accuracy.
Checking Symmetry and Proportion
Flip your drawing upside down or view it in a mirror. This trick helps spot imbalances in leg angles, ellipse alignment, or uneven thickness. Ensure the base is wider than the top attachment point, this follows real-world physics and prevents a top-heavy look.
For round tables, verify that the ellipse appears uniform on both sides of the central vertical axis. Ensure the flattening of the ellipse matches the angle of the legs. If the table is viewed from high up, the ellipse is rounder, if viewed from eye level, it is flatter.
Maintaining Consistent Lighting
Decide early, is light coming from the top left, right, or front? Keep all shadows and highlights consistent with that direction. Mixed lighting breaks realism. Apply the same light source direction across the tabletop, legs, and floor shadows.
Practicing the Core Sequence
Repetition builds skill. Follow this order every time. Sketch quickly at first, focus on form, not perfection. Over time, your lines will become more confident and accurate.
Frequently Asked Questions About Drawing a Dining Room Table
What is the best shape to start with when learning to draw a dining table?
Begin with a round table using an ellipse for the tabletop. This approach introduces perspective concepts without the complexity of rectangular tables. The ellipse represents the circular top viewed from an angle and serves as the foundation for the entire structure.
How do I make my drawn table look three-dimensional?
Add thickness to the tabletop using a second, smaller ellipse beneath the first. Connect them with vertical lines to show the underside. Apply shading on the sides where supports meet the table and add a floor shadow beneath the base. These techniques create the illusion of depth.
Why do my table legs look unstable or flat?
The legs must angle outward and away from the viewer to create depth, not parallel. Use converging lines that move away from you. For the leg positioned farthest away, draw a slight reveal beneath the tabletop edge to show it is attached behind the front plane.
Should I use a pencil or pen when drawing a dining table?
Start with light pencil strokes for the initial construction, allowing easy adjustments. Once the structure is correct, use a fine-tip pen for inking the final lines. Let the ink dry completely before erasing pencil guidelines to prevent smudging.
How do I shade a glossy tabletop realistically?
Add a distinct highlight along the top front edge where the light hits directly. Use a light gradient across the tabletop surface, fading from light to dark based on the curve of the ellipse. This mimics reflection and creates a polished, realistic finish.
Key Takeaways for Drawing Dining Room Tables
Drawing a dining room table is more than just copying shapes. It is about understanding how objects occupy space. By mastering perspective, line weight, and shading, you build skills that transfer to all kinds of furniture and architectural drawings. The core sequence matters: start with the tabletop shape, add thickness, draw the support structure, refine with ink, then apply shading.
Practice the step-by-step process repeatedly. Begin with round pedestal tables as they are easier for beginners, then progress to multi-leg designs. Always verify symmetry, maintain consistent lighting direction, and ensure proper line hierarchy for a professional finish. Start simple, practice consistently, and soon you will be able to sketch any table from memory, whether round, rectangular, modern, or antique.