Refinish Kitchen Table: Quick Steps
A worn, scratched, or outdated kitchen table doesn’t need to be replaced. Refinishing it can transform a tired dining centerpiece into a stunning focal point that matches your style and withstands daily use. Whether the finish is peeling, yellowed, or simply outdated, learning how to refinish a kitchen table gives you professional results in just a few days. This guide walks you through every step, from assessing the wood to applying a durable topcoat, so you can confidently tackle the project and enjoy a like-new table for years.
Check Your Table’s Condition Before Starting

Before picking up sandpaper or stripper, inspect your table thoroughly to determine what kind of work it needs. A proper assessment prevents mistakes and ensures a smooth refinishing process from the start.
Look for Surface and Structural Damage
Examine the tabletop, legs, and joints carefully. Look for deep scratches, water rings, burned-in stains, or areas where the finish has worn down to bare wood. These will need extra attention during prep. Test the table’s stability by wiggling the legs and pressing on the corners. If it wobbles or creaks, there may be loose joints or failing glue. Address structural issues before refinishing, or your hard work could be undone by a collapsing leg. For vintage or antique tables, consider whether refinishing aligns with your goals, since this process can reduce collector value.
Identify the Wood Type and Existing Finish
Knowing what kind of wood you’re working with is crucial for success. Common kitchen table woods include oak, poplar, walnut, maple, and pine. Oak often has a pronounced grain with red undertones, poplar is softer with a greenish or grey hue, and walnut is rich and dark. Some tables have veneer, which is a thin layer of real wood about 1/16 inch thick glued over plywood. Veneer requires gentle handling to avoid sanding through. To test for veneer, inspect the edges or underside for a visible seam. Also determine the existing finish: is it glossy varnish, lacquer, or a painted coating? This affects your stripping method. A small scratch in an inconspicuous area can reveal the wood beneath and help you decide your approach.
Select the Perfect Finish Style for Your Table
Your choice of stain or paint should complement your home’s decor and the table’s design. The right finish enhances the wood’s character while fitting your lifestyle and needs.
Match Finish to Your Table’s Style
Modern or mid-century tables, like Danish or teak designs, look best with light to medium stains that highlight clean lines. White oak stained in a warm grey or natural tone works beautifully. Traditional or country-style tables, such as pedestal or maple models, suit warm oak or honey finishes. Ornate Victorian or Queen Anne tables benefit from deeper stains like cherry or mahogany that emphasize carved details. If you prefer a bold look, consider painting. White, black, or soft aqua add contrast, especially when paired with colorful chairs. Painted finishes are forgiving on lower-quality wood and can create a farmhouse or shabby-chic vibe.
Correct Unwanted Wood Tones
Some woods, like red oak, develop an unflattering orange cast when stained. Use color theory to neutralize it. Green-based stains like Varathane Aged Wheat cancel out red, while grey tones such as Aged Barrel mute orange. Apply a thin layer of the correcting stain over a base coat to balance the color. For mixed woods where the top, legs, and apron are different species, layer stains strategically. Start with a unifying base like Early American, then apply a final coat that blends the tones. Gel stains are excellent for this because they sit on the surface and provide more even coverage across varying wood densities.
Set Up a Safe Work Area
Refinishing involves chemicals and fine dust, so proper setup protects your health and ensures better results. Taking time to prepare the workspace pays off during the messy stripping phase.
Ensure Proper Ventilation and Protection
Work outdoors if possible, on a driveway, patio, or in a garage with doors open. Chemical strippers release strong fumes, and even low-odor versions require good airflow. If working indoors, use fans to exhaust air and keep windows wide open. Wear nitrile gloves to protect against stripper burns, a respirator mask with organic vapor filters, safety goggles, and closed-toe shoes. An apron or old clothes will shield your body from drips and dust. Your health is not worth risking for a faster process.
Protect Floors and Surrounding Areas
Lay down thick drop cloths, cardboard, or metal pans to catch runoff and debris. Have a dedicated garbage bag ready for used rags, steel wool, and chemical sludge. These are hazardous and should be disposed of according to local regulations. Keep children and pets away from the workspace entirely. Organize tools within reach: brushes, scrapers, rags, and cleaning solvents. A well-prepped area saves time and reduces mess during the stripping phase.
Strip the Old Finish Completely
Removing the existing finish is essential for professional results. Skipping this step leads to poor adhesion, cloudy results, and an uneven appearance that ruins the final look.
Apply Chemical Stripper Correctly
Chemical stripping is the most effective method for large surfaces. Use a fresh paste or liquid stripper like Klean Strip or QCS by Strip Weld. Pour a generous amount onto the table and spread it evenly with a chip brush, following the grain. Don’t over-brush, as this evaporates the active ingredients too quickly. Cover all areas, especially corners and carvings. Let the stripper sit for 10 to 20 minutes or as directed on the product label. Watch for the finish to bubble and lift. Avoid scraping too early, as patience prevents rework and ensures complete removal.
Scrape and Clean All Residue
Use a plastic or dull metal scraper at a low angle to remove softened finish. Push the gunk into a metal pan or cardboard box, never let it pile on the floor. For detailed areas, wrap steel wool around a stick or use a wire brush to reach crevices. Turn the steel wool often to expose clean surfaces. If streaks remain, apply more stripper with steel wool to scrub it in thoroughly. After scraping, neutralize the wood properly. For water-based cleanup, mist a rag with water and wipe thoroughly. For oil-based strippers, use mineral spirits or lacquer thinner on a lint-free cloth to dissolve wax and chemical residue. Change rags frequently until they come away completely clean.
Allow Full Drying Time Before Sanding
Let the wood dry completely before sanding, especially if water was used during cleanup. Moisture trapped in the grain causes blotchy staining or bubbling under the topcoat. Wait at least 24 hours in a dry, well-ventilated area. Touch the surface to confirm it’s no longer cool or damp. Rushing this step risks ruining the entire project and forces you to start over.
Repair and Sand the Surface Properly
Once stripped, the wood needs smoothing and any damage addressed to create a flawless base for staining. This step sets the foundation for the final finish.
Fix Dents and Loose Joints First
For shallow dents, place a damp cloth over the area and press with a hot iron. The steam swells compressed wood fibers, often lifting the dent to the surface. Let it dry completely before sanding. Deep dents may remain as character marks, so accept them or fill with wood putty matching the species. For loose legs or joints, disassemble if possible, remove old glue with a chisel, reapply wood glue, and clamp tightly. Reinforce weak corner blocks if needed. Let joints cure for 24 hours before continuing with the refinishing process.
Sand with the Correct Grit Progression
Start sanding after the wood is dry and repairs are complete. Use an orbital sander for flat surfaces and hand blocks for edges and legs. Begin with 80 or 100-grit paper if heavy residue remains. Move to 120 or 150-grit to remove scratches from the previous pass, then finish with 180 or 220-grit for a smooth, open grain. Always sand with the grain, since cross-grain marks are nearly impossible to hide. On veneer, apply light pressure to avoid sanding through the thin layer. Hand-sand intricate details to preserve their shape. After sanding, wipe the entire surface with a tack cloth or vacuum to remove all dust. Any leftover particles will ruin the finish.
Apply Stain for Even, Professional Color
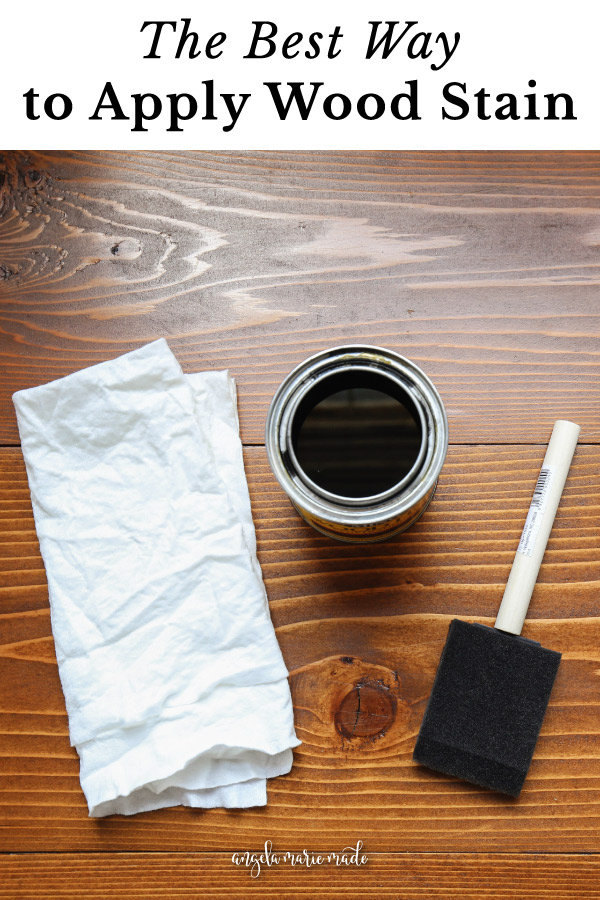
Staining enhances the grain and sets the final look. Proper preparation and technique ensure a consistent, professional result that transforms the table.
Use Pre-Stain Conditioner on Softwoods
Pine, poplar, and other softwoods absorb stain unevenly, leading to blotches that ruin the final appearance. Prevent this by applying a pre-stain wood conditioner before staining. Wipe it on with a rag, wait 5 to 15 minutes per product instructions, then wipe off excess. This seals the pores slightly and allows more uniform absorption. Even some hardwoods benefit from conditioning if they’ve been heavily sanded. Always test your stain on a scrap piece or hidden area first, especially on mixed-wood tables where different areas may react differently.
Apply Stain in Thin, Controlled Coats
Use a high-quality natural or foam brush or a lint-free rag to apply stain. Work in the direction of the grain, coating a manageable section at a time. Let it sit for 5 to 15 minutes, longer for a darker color, then wipe off excess with a clean cloth. Avoid letting stain pool in corners or crevices. For deeper color, apply 2 to 3 coats, lightly sanding with 220-grit paper between coats to smooth raised grain. Let each coat dry fully, typically 24 hours for oil-based stain, before applying the next. Gel stains are ideal for veneer or inconsistent woods because they sit on top and provide even coverage with less risk of blotching.
Apply Durable Topcoat Protection
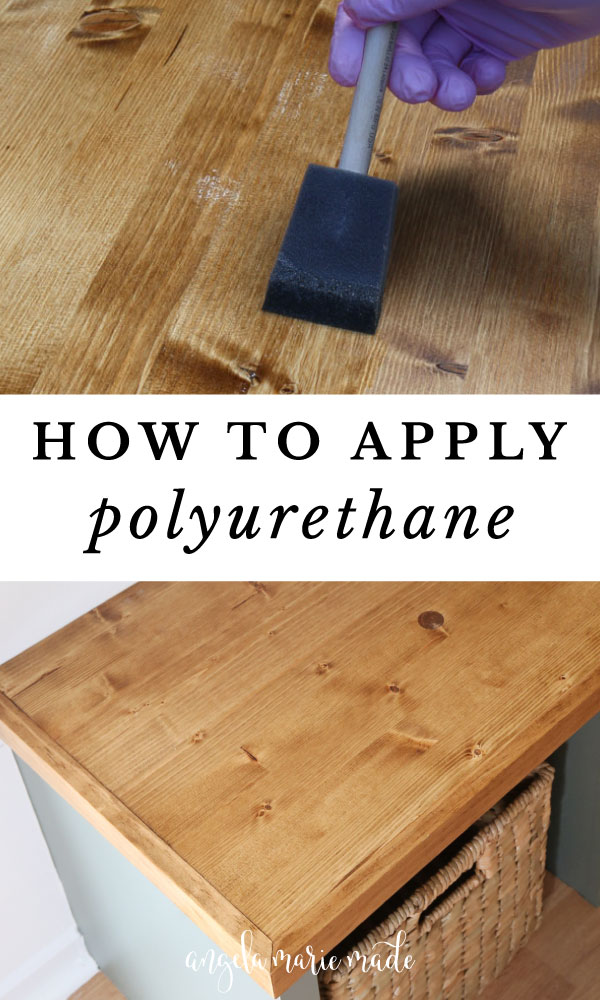
The topcoat seals everything and protects against spills, heat, and scratches. Choosing the right formula for your needs ensures the table lasts for years.
Choose the Right Polyurethane Type
Oil-based polyurethane offers the toughest, most water- and heat-resistant finish. It enhances grain and dries to a warm amber tone, ideal for traditional tables. However, it has strong fumes and yellows over time. Water-based polyurethane, also called Polycrylic, dries clear and fast with low odor. It’s best for light woods or modern designs where yellowing is undesirable. It’s slightly less durable but easier to work with. Wipe-on polyurethane is user-friendly, minimizes brush marks, and gives a soft sheen. It requires more coats but is perfect for beginners. For kitchen tables where durability is key, oil-based or high-performance water-based formulas are recommended.
Apply Thin, Smooth Coats
Stir polyurethane gently, don’t shake the can to avoid bubbles. Pour a small amount into a clean container. Use a high-quality brush or lint-free rag to apply a thin, even coat, following the grain. Maintain a wet edge to prevent lap marks. Let dry according to the label, typically 24 hours for oil-based and 2 to 4 hours for water-based. Lightly sand between coats with 220-grit paper to remove dust nibs, then wipe clean with a tack cloth. Apply at least 3 to 4 coats for heavy use. The final coat should cure for 24 to 48 hours before placing items on the table. Full hardness takes up to 30 days, so handle with care during this time.
Add Wax for Extra Protection and Shine
A final wax layer adds a silky feel, boosts water resistance, and enhances the overall luster. This step is optional but highly recommended for the best results.
Buff with Paste Wax Correctly
After the last polyurethane coat has fully cured, wait at least 48 hours before applying wax. Use 0000 steel wool or a soft cloth to apply a thin layer of paste wax. Work in small sections, applying light pressure. Let it haze for 5 to 10 minutes, then buff vigorously with a clean, lint-free cloth. This creates a smooth, protective barrier that repels water and resists light scratches. Reapply wax every 6 to 12 months to maintain performance, especially on high-use surfaces that see daily meals and activities.
Frequently Asked Questions About Refinishing a Kitchen Table
How long does it take to refinish a kitchen table?
The complete process typically takes 3 to 5 days. This includes 1 day for stripping, 1 to 2 days for drying and repairs, 1 day for staining, and 2 to 3 days for applying topcoats. Rushing any phase compromises the final result.
Can I refinish a table with veneer?
Yes, but you must be extremely careful. Veneer is only about 1/16 inch thick, so use light pressure when sanding and avoid chemical strippers that might lift the glue. Consider using gel stain instead of liquid stain for more even coverage.
What if my table has water stains or white rings?
Water stains often sit in the finish rather than the wood. During the stripping process, these should lift away. If the stain penetrated the wood, sanding usually removes it. Deep stains may require bleaching or may remain as character marks.
Why does my stain look blotchy?
Blotchy stain usually results from uneven wood porosity, common in softwoods like pine. Using a pre-stain wood conditioner before staining prevents this. Always test on a hidden area first.
How do I fix orange or red tones in oak?
Orange tones in red oak come from oil-based stains amplifying natural undertones. Counteract this by applying a stain with green or grey undertones, like Varathane Aged Wheat or Aged Barrel, over the first coat. This neutralizes the red without removing it.
When can I use my refinished table?
The surface feels dry within 48 hours, but the finish takes full cure time of up to 30 days to reach maximum hardness. Use gentle care during the first month, and avoid placing hot items directly on the surface until the cure is complete.
Key Takeaways for Successfully Refinishing Your Kitchen Table
Refinishing a kitchen table is a rewarding DIY project that combines craftsmanship with creativity and delivers lasting results. The most critical steps are proper assessment, which determines your approach, and thorough stripping, which ensures the new finish adheres correctly. Always address structural issues before refinishing, use the right products for your wood type, and allow adequate drying time between each phase. With proper maintenance, including reapplying wax every 6 to 12 months, your refinished table will withstand meals, homework, and family gatherings for years to come. The process proves that with the right approach and patience, old furniture can look and function like new.