How to Make a Table Base: Quick Steps
Building a sturdy, attractive table base is the foundation of any great wooden table. Whether you’re crafting a farmhouse dining table, a sleek pedestal coffee table, or a rustic X-base design, the base determines stability, style, and longevity. Knowing how to make a table base correctly ensures your tabletop stays secure, level, and visually balanced for decades. This guide walks you through every phase, from selecting the right lumber to attaching the top, using proven techniques like pocket hole joinery, half-lap joints, and Z-clip mounting.
Choose the Right Lumber for Your Table Base
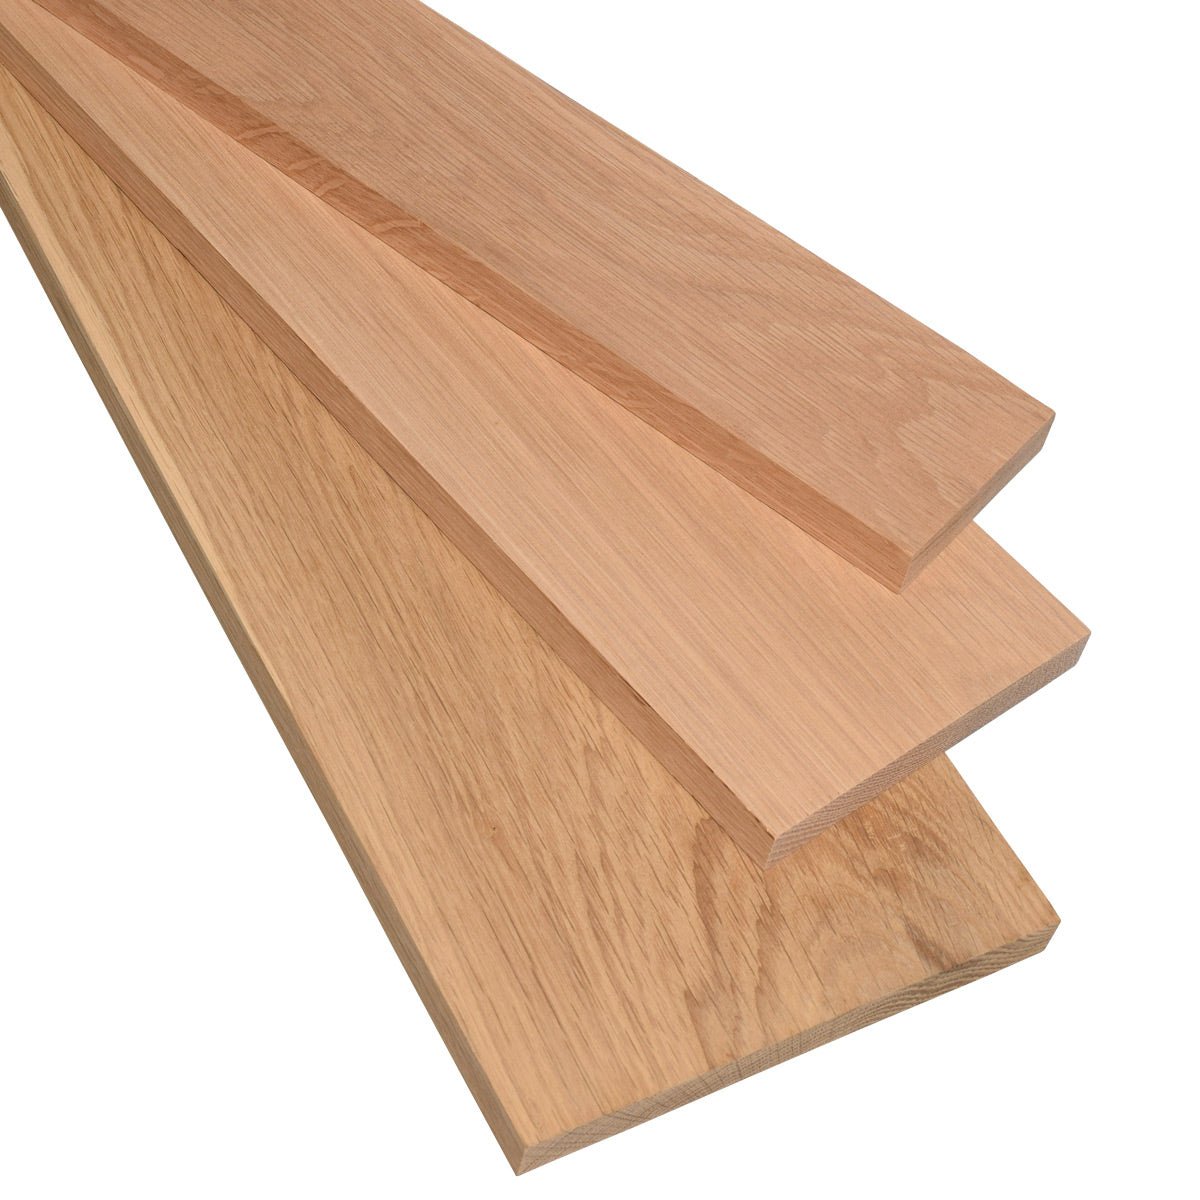
The material you select directly impacts strength, appearance, and cost. Understanding your options helps you make smart choices for your specific project and budget.
Select Construction Lumber for Budget Builds
For most DIY table bases, 2x4s and 4x4s are the go-to materials due to availability, cost, and strength. Use 2x4s for aprons, braces, and X-frames in farmhouse or coffee tables. Opt for 8-foot boards to minimize joints and maximize usable length. For heavy-duty pedestal bases, 4x4s (3.5″ x 3.5″) provide the necessary support, especially under solid wood or concrete tops. Some builders rip 4x4s down to 3″ x 3″ for a cleaner profile. Use 2x2s for internal bracing in pedestal designs where lighter support is needed.
A basic X-base coffee table using 2x4s costs around $20–$25 in lumber. A full wood pedestal dining base runs about $45 (excluding the top). Pre-turned legs cost under $180 for a set of four, saving hours of labor versus turning your own.
Use Hardwoods for Premium Projects
When building high-end tables, white oak is a top choice—dense, durable, and beautifully grained. However, it demands extra care. Rough-cut white oak must acclimate in your workshop for 2.5 to 3 weeks before milling to prevent warping. Milling hardwoods requires precision: face-joint one side, edge-joint an adjacent face, straight-line rip the opposite edge, then plane to final thickness. This ensures square, flat boards essential for tight glue-ups. Perform a dry fit after surfacing to verify joint alignment before gluing.
Master Essential Joinery Techniques
:max_bytes(150000):strip_icc()/Wood-Joints-fdf0ae5b6e2c40438e6800fe91fe2733.png)
The joinery method you choose determines how much weight your table base can support and how long it lasts. Each technique has specific strengths suited to different applications.
Use Pocket Hole Joinery for Speed
Pocket hole joinery is the fastest, most accessible method for assembling table bases. Use a Kreg K4 jig or equivalent to drill angled holes into aprons, braces, and legs. For 2×4 aprons attaching to legs, use 2.5-inch screws. For thinner intersections (like X-base frames), 1.5-inch screws suffice. Drill holes on the inside face of aprons to hide fasteners. When attaching braces, vary placement—some get two end holes, others a single center hole—to avoid screw collisions.
Apply wood glue to joints before clamping and driving screws. The screws pull joints tight, but clamps ensure perfect alignment. After assembly, fill holes with wood putty, sawdust mix, or commercial plugs before finishing.
Build Strong Half-Lap Joints
For heavy-duty bases—especially those supporting concrete tops—half-lap joints outperform pocket holes under shear stress. Cut away half the thickness of each board at the intersection so they sit flush. Use a table saw, miter saw, or dado blade for accuracy. In pedestal builds, these joints connect X-frames at the center. Reinforce with generous wood glue—screws may be omitted if access is tight, as the mechanical lock provides strength.
Install Mortise and Tenon Connections
To attach a tabletop securely to a pedestal base, use mortise and tenon joints—a time-tested method for durability. For efficiency, create a plywood template over the mortise location. Use a flush-trim router bit to hog out most material quickly, then clean corners with a chisel. This saves hours compared to hand-chopping and ensures consistency across multiple joints.
Cut Precise Angles for Stable Construction
Accurate angles are critical for wobble-free tables. Small measurement errors compound into visible instability, so use these techniques to get it right the first time.
Set Accurate X-Base Angles
Most X-base coffee tables use 30-degree angles off square for legs or braces. For more complex pedestal bracing, one end may be cut at 28 degrees, the other at 62 degrees. If your miter saw cannot cut 62 degrees directly, clamp a sacrificial board to the fence and set the saw to 28 degrees—this achieves the complementary angle needed.
Never cut bracing to theoretical measurements. Assemble the main frame first, then measure the actual opening. Place the board against the gap and trace the angles directly to account for minor leg misalignments (even 1/8″ matters).
Mill Lumber for Flat, Square Edges
For seamless glue-ups and tight joints, mill all lumber properly. With hardwoods, follow this sequence: face-joint one side flat, edge-joint an adjacent face at 90°, straight-line rip the opposite edge, then plane to final thickness. For softwoods like 2x4s, plane edges and faces to remove warp and achieve square stock before cutting. Sand to 150 grit before assembly for a smooth finish.
Build a Farmhouse Table Frame

Farmhouse tables are popular for their rustic charm and robust construction. This design handles large surfaces and heavy daily use with ease.
Calculate Apron Lengths Correctly
Farmhouse tables use 2×4 aprons connecting four legs. If using pre-turned legs with 5-inch top blocks, subtract 10 inches (for both blocks) plus 2 inches for overhang (1″ per side) from the total table length.
Example: For a 10-foot (120″) table, cut aprons to 108″ (9 feet).
For a 3.5-foot (42″) width, aprons are 30″.
Inset Aprons and Add Decorative Grooves
For a refined look, inset aprons 1/2 inch from the leg’s outer edge instead of flush-mounting. This creates subtle shadow lines. For visual interest, rout a shallow decorative groove along the aprons inner edge using a straight bit or dado blade. This is purely aesthetic but enhances depth.
Install Braces and Corner Supports
Add internal support braces between long aprons to prevent sagging. Before installing them, cut Z-clip slots in the outer aprons—once braces are in, access is blocked.
Use triangular corner blocks cut at 45-degree angles on both ends. Glue and screw them into leg-apron junctions to prevent twisting or bowing, especially on long tables (10ft+).
Construct an X-Base Coffee Table
X-base designs offer a contemporary look while providing excellent stability. This versatile pattern works well for coffee tables and entryway tables.
Assemble the X-Frame Step by Step
Build the base in stages: cut three 2x4s for the main X, join two pieces into a “half-X” using 1.5-inch pocket screws, repeat for the second half, then connect both halves to the central third piece to form a full X. Ensure all angles are consistent—typically 30 degrees at leg ends.
Build and Attach a Round Top
Glue five 2×8 boards together for a 34-inch diameter tabletop. Joint edges square before gluing. Clamp tightly or use pocket screws from underneath (avoiding future cut lines) if clamps are limited.
Cut the circle with a jigsaw, bandsaw, or router with a circle jig. A router produces the cleanest edge. Sand to 150 grit before finishing.
To attach, drill pocket holes in the top of the legs and screw upward into the underside of the tabletop. Center the base on the inverted top before securing.
Add Aesthetic Finishes
For a vintage look, transfer Roman numerals like a clock face: print them in mirror image, iron transfer onto the wood, then immediately seal with polycrylic to prevent ink smudging. Finish with Minwax Provincial stain, then dry-brush white paint over it. Lightly sand for a distressed farmhouse effect.
Assemble a Pedestal Table Base
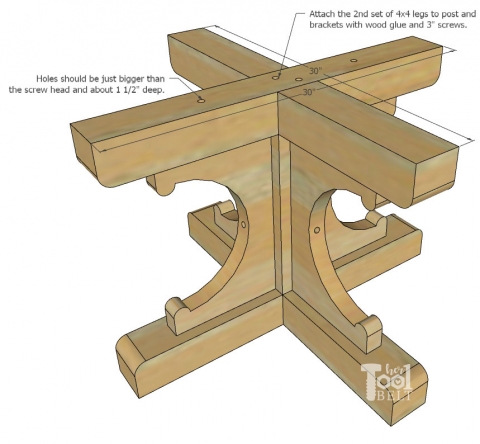
Pedestal bases work well for round tables and save floor space. They require careful joinery but create elegant, stable results.
Follow the 4×4 Cut List
A sturdy round pedestal base uses 4×4 legs and braces: 4 legs @ 27.5″, 4 cross-pieces @ 22.5″, 2 long braces (2×2) @ 26.625″ (measure after assembly), and 4 short braces (2×2) custom-fit on-site.
Connect X-Frames with Half-Laps
Create two X-frames using 4x4s. Cut ends at 30 degrees with a 1/2-inch flat spot at the bottom for floor contact. Join centers with half-lap joints and glue.
Connect top and bottom X-frames using the 22.5″ 4×4 pieces, screwed in place. Set legs 1/2 inch back from angled ends for stability.
Install X-Bracing for Strength
Add 2×2 braces between legs in an X pattern. Glue heavily. If screws can reach, drive them in; otherwise, rely on glue and mechanical fit. For extra support, install a beveled oak X-bracket under the tabletop.
Use Professional Tools and Equipment
Having the right tools makes every phase faster and more accurate. Here is what you need for each stage of construction.
Cut with Precision Tools
A miter saw handles cross-cuts and angles (30°, 45°, 62°). Use a stop block for repeat cuts. A table saw rips lumber, squares edges, and cuts grooves. A jigsaw rough-cuts circles before final routing. A bandsaw cuts curves in thick oak, though blade breakage is common—keep spares. A router with a straight bit edges panels, a flush-trim bit works templates, and a circle jig cuts perfect round tops.
Shape and Clean Up Joints
Chisels clean mortise corners. A Dremel tool with burr bit smooths tight crevices in X-bracing. A die grinder with cutsaw bit refines deep joints. A multi-tool with sanding pad reaches corners post-assembly.
Finish with Proper Equipment
A random orbit sander progresses to 150 grit before finishing. A spray gun applies even polyurethane or polycrylic coats (use respirator and ventilation). A fly swatter is essential in fall to keep bugs from marring wet finish.
Finish and Troubleshoot Like a Pro
The final finish protects your work and enhances its beauty. Proper application prevents common problems that ruin otherwise solid builds.
Apply Stain and Sealant Correctly
Popular stains include Minwax Provincial (warm brown tone) and Varathane Briarsmoke (gray-brown, appears grayer in person than online). After staining, apply dry-brushed white paint for a weathered look. Sand lightly to reveal wood grain. Seal with polycrylic to prevent smudging, especially over ink transfers. Use 2–3 coats for durability.
Fix Common Build Issues
Fly droppings in finish occur when shop doors are left open during drying. Scuff with 220-grit, clean, and respray. Splintering on curves happens often in white oak. Prevent with jigsaw relief cuts before routing. Work slowly with a large diameter flush-trim bit. Blade breaks on bandsaw are expected with thick oak. Ensure proper tension and keep spare blades. Gaps in joints result from skipping milling steps. Prevent with strict milling: joint, rip, plane, dry fit.
Secure the Tabletop Properly
:max_bytes(150000):strip_icc()/1164-0c242eeb354d4cca978884b48afcbdc3.jpg)
Proper attachment allows the top to move with seasonal humidity changes while staying firmly attached to the base.
Use Z-Clips for Wood Movement
Solid wood expands and contracts seasonally. Z-clips allow movement while securing the top. Install before adding internal braces—once braces are in, you cannot route the apron slots. Place clips 24 inches from each end of the apron. Route slots with a slot cutter bit, then attach mating clips to the tabletop underside.
Install Threaded Inserts for Heavy Tops
For pedestal bases with concrete or thick wood tops, use threaded inserts: mark base attachment points, drill holes and install inserts, then use elongated bolts and washers to connect the top. This allows for wood movement. Add leg levelers to the bottom of legs to stabilize on uneven floors.
Frequently Asked Questions About Making Table Bases
What is the strongest joinery method for table bases?
Half-lap joints are the strongest for heavy-duty applications, particularly when supporting concrete or stone tops. They withstand shear stress better than pocket holes and create solid mechanical connections. Mortise and tenon joints are also extremely strong and traditional, ideal for attaching tops to pedestal bases.
How do I prevent my table base from wobbling?
Wobbling usually stems from inaccurate angles or loose joinery. Always trace angles directly from the actual frame rather than cutting to calculated measurements. Use corner support blocks cut at 45 degrees at every leg-apron junction. Ensure all joints are glued and fastened properly. For long tables, add cross braces to prevent sag and twisting.
Can I use regular construction lumber for a table base?
Yes, 2x4s and 4x4s work well for most DIY table bases. They are affordable, readily available, and strong enough for standard wooden tops. For visible components or premium finishes, consider surfaced hardwoods. Always plane construction lumber to remove warp and achieve square edges before assembly.
How do I attach a tabletop that will expand and contract?
Use Z-clips for standard table bases. These hardware pieces allow the top to slide horizontally while remaining secured. For pedestal bases, use elongated bolts with threaded inserts—the elongation accommodates seasonal movement. Never bolt a solid wood top directly to a fixed base, or cracking will result.
How long does it take to build a table base?
A simple X-base coffee table takes 4–6 hours for a beginner. A farmhouse table frame requires 8–12 hours including milling and finishing. Complex pedestal bases with half-lap joinery may take 12–16 hours. Pre-turned legs significantly reduce time compared to turning your own.
Key Takeaways for Building Table Bases
Building a table base is about creating a foundation that is strong, stable, and stylish. Choose the right lumber for your project: 2x4s for budget builds, 4x4s for heavy-duty pedestal bases, and white oak for premium furniture. Always mill your stock properly—face-joint, edge-joint, rip, and plane before cutting joinery.
Pocket holes offer speed and accessibility, while half-laps provide superior strength for heavy tops. Trace angles directly from your assembled frame rather than relying on theoretical measurements. Account for wood movement with Z-clips or elongated bolts, especially on solid wood tops.
Sand thoroughly to 150 grit before assembly, seal any ink transfers immediately with polycrylic, and never skip the dry fit. With the right materials, tools, and techniques, you can build a table base that lasts for generations—no matter the style you choose.