How to Refinish a Table for Beginners
You found a beautiful wooden table at a thrift store, garage sale, or tucked away in your basement—but it’s dull, scratched, or outdated. Instead of replacing it, why not give it new life? Refinishing a table is one of the most rewarding DIY projects for beginners. With the right steps, tools, and patience, you can transform worn furniture into a stunning centerpiece.
The process may seem intimidating at first, especially when faced with stripping old finishes, sanding, and choosing stains. But by breaking it down into clear, manageable phases, even someone with no prior experience can achieve professional-looking results. The key is understanding your table’s material—solid wood, veneer, or laminate—as this determines how far you can go without damaging it.
Assess Your Table’s Material

Before lifting a sanding block or opening a stripper jar, identify what your table is made of. This decision shapes every step that follows.
Solid Wood vs. Veneer vs. Laminate
Solid wood tables are ideal for refinishing. They’re durable, can be sanded multiple times, and respond well to stain and finish. Common types include oak, maple, and pine. Look for consistent grain that continues through edges and legs.
Veneer is a thin layer of real wood (about 1/16 inch thick) glued over particleboard or MDF. It often shows a repeating grain pattern because it’s sliced from a rotating log. While it can be refinished, aggressive sanding will burn through the surface, ruining the piece. Stick to light sanding with 220-grit paper and minimal pressure.
Laminate is a plastic coating printed with a fake wood grain. It cannot absorb stain or be stripped like real wood. If your table has a perfectly uniform, almost too consistent pattern and feels smooth and hard, it’s likely laminate. In that case, skip staining—your best option is painting after proper surface prep.
Check for Structural Damage
Inspect joints, legs, and tabletop edges. Wiggle the legs—if there’s movement, tighten screws or reglue loose joints before refinishing.
Look for:
• Deep cracks or splits
• Loose veneer edges
• Gouges or water stains
• Warping
Fix structural issues first. Use wood glue for joints, wood filler for dents, and clamps to hold pieces while drying. A stable table is essential for a smooth, lasting finish.
Gather Essential Tools and Safety Gear
Having the right supplies on hand prevents interruptions and ensures safety during chemical and dust-heavy work.
Safety First: Protect Yourself
Refinishing involves chemicals and fine dust—both are hazardous if inhaled or touched.
Always wear:
• Nitrile gloves (resistant to solvents)
• Safety goggles (to protect eyes from splashes and debris)
• Respirator mask with organic vapor filters (for stripper fumes)
• Long sleeves and closed-toe shoes
Work outdoors or in a well-ventilated garage. Open windows, use fans, and never work near open flames—chemical strippers are flammable.
Must-Have Tools and Supplies
Cleaning supplies:
• All-purpose cleaner
• Scrubby sponge
• Lint-free cloths
• Tack cloth (for final dust removal)
Stripping supplies:
• Chemical stripper (paste or liquid)
• Natural bristle brush (for application)
• Plastic scraper or rounded putty knife
• Steel wool (0000 for cleanup)
• Lacquer thinner (for residue removal)
• Spray bottle with water (to neutralize)
Sanding supplies:
• Orbital sander (for flat surfaces)
• Sanding block (for edges and legs)
• Sandpaper: 80, 120, 180, 220, 320 grit
• Vacuum or brush (for dust control)
Staining and finishing supplies:
• Wood conditioner (especially for pine)
• Wood stain (oil-based, gel, or water-based)
• Polyurethane (oil or water-based)
• Foam or synthetic brush (for water-based finishes)
• Natural bristle brush (for oil-based)
• Clean rags (for wiping stain)
Optional items:
• Paste wax
• Soft buffing cloth
• Baby syringe (for mixing custom stain colors)
Strip the Old Finish Safely
Removing the existing finish is often the fastest way to start fresh—especially on thick, glossy, or layered surfaces.
Choose: Strip or Sand?
Chemical stripping is faster for heavy finishes and safer for veneer since it minimizes sanding. Mechanical sanding works well for thin finishes or paint but creates more dust and heat.
For beginners, chemical stripping is usually the better choice.
Apply Chemical Stripper
- Work in sections (e.g., one tabletop half at a time).
- Apply a thick, even layer of paste stripper with a disposable brush. Avoid over-brushing to prevent drying.
- Wait 10–15 minutes (or as directed). Watch for bubbling—this means the finish is lifting.
- Scrape off softened finish using a plastic scraper at a shallow angle, following the grain.
- Use steel wool for corners, carvings, and detailed areas.
Pro Tip: Do not let stripper dry on the surface. If it dries, reapply.
Clean and Neutralize Residue
After scraping:
• Spray the area lightly with water or use lacquer thinner to remove chemical residue.
• Wipe with a clean rag until no dark gunk transfers.
• For oily residues, use fine steel wool (0000) dampened with lacquer thinner.
• Let the wood dry completely—at least 24 hours—before sanding.
Sand for a Smooth Base
Even after stripping, the surface may have leftover finish, scratches, or raised grain. Sanding prepares the wood to accept stain evenly.
Sanding Grit Progression
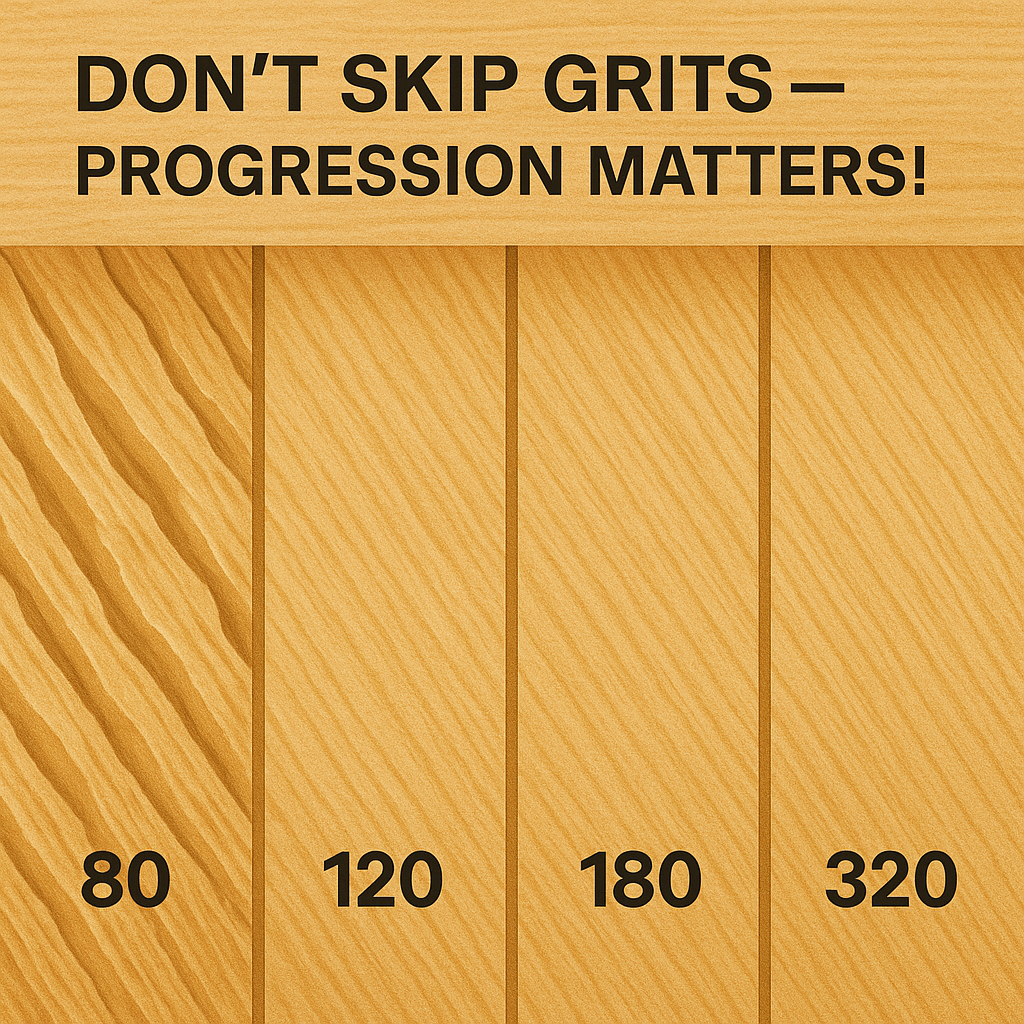
Follow this sequence for best results:
• 120-grit: Level the surface and remove minor imperfections
• 180-grit: Smooth out scratches from 120
• 220-grit: Final prep for staining
Never skip grits. Each step removes the scratches from the previous one.
How to Sand Properly
• Always sand with the grain, never across it.
• Use an orbital sander on flat surfaces; hand-sand edges and legs with a sanding block.
• Apply light, even pressure—let the tool do the work.
• Wipe dust with a tack cloth between grits.
Expert Note: If working with veneer, stop at 220-grit. Over-sanding can expose the substrate underneath.
Repair Dents, Gouges, and Gaps
A flawless finish starts with a smooth surface. Now’s the time to fix flaws.
Fill Holes and Cracks
Use wood filler that matches your wood tone:
1. Apply with a putty knife, pressing firmly into the void.
2. Scrape excess off flush with the surface.
3. Let dry completely (check product instructions—usually 2–6 hours).
4. Sand smooth with 180–220 grit.
For hairline cracks, use a thin filler or leave them for character if they add rustic charm.
Fix Lifting Veneer
If veneer is peeling:
1. Inject wood glue under the edge with a syringe or thin applicator.
2. Press down and clamp with wax paper between the clamp and wood.
3. Wipe excess glue quickly.
4. Let dry 24 hours before sanding.
Prevent Blotchy Stain on Softwoods
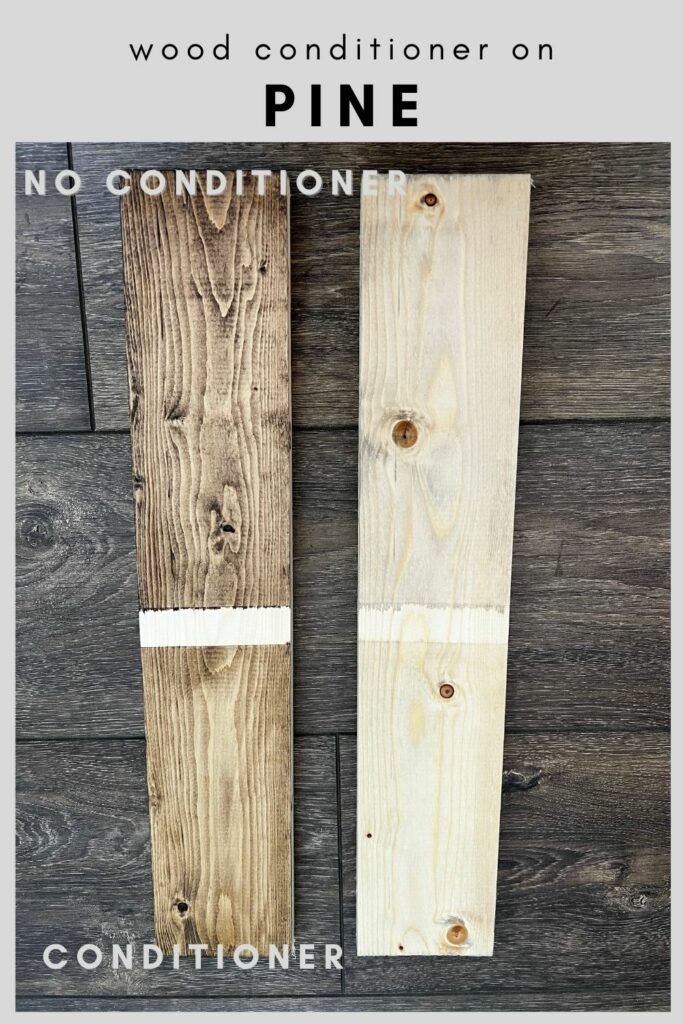
Pine, poplar, and other softwoods absorb stain unevenly, leading to splotchy, dark patches. Prevent this with proper prep.
Use Wood Conditioner
This pre-stain treatment slows absorption so stain spreads evenly.
How to apply:
1. Stir conditioner well.
2. Brush or wipe it on generously.
3. Wait 5–15 minutes (per label).
4. Wipe off all excess with a clean rag.
5. Apply stain immediately—do not let conditioner dry.
Try Gel Stain for Uniform Color
Gel stains sit on top of the wood rather than soaking in. They’re ideal for:
• Pine
• Maple
• Veneer
• Mixed-wood pieces
They apply more like paint and offer better control over color.
Test and Apply Your Chosen Stain
Color choice makes or breaks your project. Always test first.
Do a Stain Test First
Apply your stain to an inconspicuous area (underside, leg back) or a scrap piece of similar wood. Let it dry fully—color deepens as it cures.
Test multiple options:
• Light (e.g., Golden Oak)
• Medium (e.g., Special Walnut)
• Dark (e.g., Jacobean)
• Gray or white wash for modern looks
Apply Stain Like a Pro
- Stir, do not shake the stain.
- Apply with a brush or lint-free rag in the direction of the grain.
- Let sit 5–15 minutes (longer = darker).
- Wipe off excess with a clean cloth—do not leave puddles.
- Let dry 24 hours before topcoating.
Want deeper color? Apply a second coat after 24 hours. Lightly sand with 320-grit between coats.
Fix Common Stain Problems
• Too dark? Lightly sand with 220-grit and reapply a lighter coat.
• Too red/orange? Neutralize with a gray- or green-toned stain (e.g., Weathered Oak).
• Blotchy? Next time, use conditioner or gel stain.
Choose and Apply the Right Topcoat

Stain adds color, but the topcoat provides protection. Choose based on durability and look.
Compare Finish Types
| Finish Type | Best For | Dries | Durability | Yellow Over Time? |
|---|---|---|---|---|
| Oil-Based Polyurethane | Dining tables, kids’ furniture | Slow (8–12 hrs) | Excellent | Yes (amber glow) |
| Water-Based Poly | Light woods, quick projects | Fast (4–6 hrs) | Good | No (stays clear) |
| Polycrylic | Light use, painted pieces | Fast | Moderate | No |
| Tung Oil | Natural look, hand-rubbed feel | Very slow | Low | Slight |
| Paste Wax | Final polish over other finishes | Immediate | Low alone | No |
For a beginner’s dining or coffee table, oil-based polyurethane offers the best protection.
Apply Polyurethane Smoothly
- Stir gently—never shake (bubbles!).
- Pour into a clean tray.
- Use a high-quality brush: natural bristle for oil, synthetic for water-based.
- Apply in long, even strokes with the grain.
- Keep a wet edge—do not go back over half-dry areas.
Sand Between Coats
After each coat dries (4–24 hrs):
• Lightly sand with 320-grit paper.
• Remove dust with a tack cloth.
• Apply next coat.
Number of coats:
• 2 coats: Light-use tables (end tables)
• 3 coats: Dining, coffee, and kitchen tables
Let the final coat cure 72 hours before regular use.
Fix Mistakes and Touch Up
Everyone makes mistakes. The good news? Most are fixable.
Common Errors and Solutions
Bubbles in the Finish
Cause: Shaking the can, brushing too hard, or dust contamination.
Fix: Let dry, sand smooth with 320-grit, wipe clean, reapply a thin coat.
Streaks or Uneven Sheen
Cause: Inconsistent application or dust settling.
Fix: Sand lightly, clean, and reapply.
Run or Drip
Cause: Too much finish applied in one spot.
Fix: Sand the area flat once dry, then refinish.
Finish Won’t Dry
Cause: Humidity, cold temps, or applying over uncured stain.
Fix: Wait longer. If still tacky after 48 hours, sand off and restart.
Maintain Your Refinished Table
A beautiful finish lasts longer with simple care.
Daily and Long-Term Care
• Use coasters and placemats—protect from heat and moisture.
• Wipe spills immediately with a soft, dry cloth.
• Dust regularly with a microfiber cloth.
• Clean with mild soap and water if needed—never harsh cleaners.
• Avoid direct sunlight to prevent fading.
Re-Wax for Extra Protection
After polyurethane cures, apply paste wax with 0000 steel wool. Buff with a soft cloth for a silky feel and added scratch resistance. Reapply every 6–12 months.
Know What to Avoid as a Beginner
Even experienced DIYers make these mistakes. Do not let them ruin your project.
Top 5 Beginner Mistakes
-
Skipping the cleaning step
Dirt, grease, and wax prevent stain and finish from sticking. Always clean thoroughly before starting. -
Sanding across the grain
Creates deep scratches that stain darkly and ruin the look. Always sand with the grain. -
Rushing dry times
Applying stain over damp conditioner or finish over wet stain causes cloudiness and peeling. Be patient. -
Shaking polyurethane
Creates bubbles that dry into the surface. Stir gently for 2–3 minutes instead. -
Spot refinishing
Trying to fix just one damaged area rarely blends. New finish will not match aged wood. Always refinish the entire piece for a uniform result.
Frequently Asked Questions About Refinishing a Table
Can I refinish a table without sanding?
Sanding is almost always necessary for proper stain adhesion. However, if you’re painting rather than staining, you may get away with thorough cleaning and scuff-sanding. For stain, proper sanding creates the porous surface needed for even color absorption.
How long does it take to refinish a table as a beginner?
Plan for a full weekend (2–3 days) minimum. This includes drying time between stages—stripper needs 24 hours to dry after scraping, stain needs 24 hours before topcoat, and each polyurethane coat needs 4–12 hours to dry. Full cure takes 72 hours.
Should I use stain or paint on my table?
Choose stain if you want to enhance the natural wood grain and have a solid wood or thick veneer piece. Choose paint if the table is laminate, heavily damaged, or you want a bold color. Paint requires less prep but still needs cleaning, sanding, and priming.
Do I need to hire a professional for veneer tables?
Not necessarily, but you must be cautious. Veneer is thin (1/16 inch), so aggressive sanding ruins it. Use fine grit (220), minimal pressure, and consider using gel stain instead of traditional stain to avoid burn-through.
What is the most important step in refinishing a table?
Proper surface preparation—cleaning, stripping, and sanding—determines your final result more than any other step. Rushing prep leads to bubbles, peeling, and uneven color. Take your time with these early stages.
Key Takeaways for Refinishing Your First Table
Refinishing a table as a beginner is totally achievable with the right plan. Start with a solid wood or thick veneer piece, work in a ventilated space, and follow each step carefully. With patience and attention to detail, you will transform an old table into a custom piece that looks like it came from a high-end furniture store.
The skills you gain—cleaning, stripping, sanding, staining, and sealing—will serve you well on future projects. Remember to test your stain color first, sand with the grain, and allow proper dry times between each stage. Now grab that sander and give that tired table the new life it deserves.