How to Build a Folding Table
Nothing beats the convenience of a sturdy, well-built folding table. Whether you need extra dining space for guests, a portable workbench for your garage, or a lightweight companion for camping trips, building one yourself gives you complete control over size, strength, and style. The best part? You do not need expensive equipment or professional skills to create a table that folds flat for storage and locks securely when in use.
This guide walks you through every step of how to build a folding table from scratch. You will learn about three popular design styles, material selection, precise cutting techniques, smart folding mechanisms, and professional finishing methods. By the end, you will have the knowledge to construct a table tailored precisely to your needs.
Choose the Right Folding Table Design for Your Needs

The first step in how to build a folding table is selecting a design that matches your intended use. Each style offers different benefits in portability, strength, and assembly complexity.
Self-Opening Spring Mechanism
This design uses tension to automatically deploy legs when you lift the tabletop. Perfect for compact spaces like apartments or RVs, it eliminates fumbling with latches. A spring, rubber band, or small counterweight provides the opening force, and the table folds completely flat for under-bed or closet storage.
Best for: Frequent movers, temporary setups, minimalist spaces
Skill level: Intermediate
Build time: 4 to 6 hours
Self-Locking Bracket Design
Commercial self-locking brackets snap into place when opened and lock securely under weight. This is the go-to choice for heavy-duty use like dining tables or outdoor event furniture. Paired with a solid wood apron and 4×4 legs, this version feels like permanent furniture but folds in seconds.
Best for: Dining, holiday hosting, workshops
Skill level: Beginner to intermediate
Build time: 3 to 5 hours
Hinge-and-Pin Compact Table
This simple design folds in half using heavy-duty hinges or removable pins. Ideal for craft tables, card games, or workbenches, it uses lightweight frames made from 1×2 or 2×2 lumber to keep the finished table easy to carry.
Best for: Temporary use, kids tables, camping
Skill level: Beginner
Build time: Under 3 hours
Select Quality Materials and Hardware
Choosing the correct wood and hardware ensures your folding table is strong, stable, and suited to its environment.
Pick the Right Wood Type
The wood you choose affects weight, durability, and appearance. Consider these options:
• Sassafras: Looks like white oak but weighs 20% less. Ideal for indoor and outdoor portable tables.
• Cedar: Naturally rot-resistant and aromatic. Excellent for outdoor, camping, or rustic-style tables.
• Cherry: Rich color that ages beautifully. Perfect for indoor dining or game tables.
• Plywood: Cost-effective for large tabletops. Use exterior-grade for outdoor projects.
Pro Tip: Mill your wood 1/8 inch oversized and let it acclimate for a week before final cutting to prevent warping after assembly.
Choose Folding Hardware
Your folding mechanism determines how the table operates. Select from these options:
• Self-locking brackets: Metal brackets that lock when opened, requiring a release lever to fold.
• Folding hinge brackets: Attach directly to legs and frame, great for DIY leg systems.
• Butt hinges: Heavy-duty hinges, 2 to 4 per leg, for basic folding action.
• Hinge pins: 1.5 inch diameter pins that let the frame fold in half cleanly.
• Tension springs or rubber bands: Provide the self-opening leg action.
Gather Essential Fasteners
You will need various fasteners for different stages of assembly:
• Screws: #6, 1 inch for tabletops. 2 inch for framing.
• Bolts: 5/32 inch and 3/16 inch machine bolts for bracket alignment.
• Wood glue: Essential for all joints and plank glue-ups.
• Corner braces: Metal L-brackets for hinge reinforcement.
• Felt pads: Prevents floor scratches.
Gather Essential Tools for the Build
You do not need a full workshop, but precision tools make the difference between a wobbly table and a rock-solid one.
Cutting and Shaping Tools
A quality circular saw or table saw handles straight cuts and leg tapering. A miter saw cuts precise 45-degree apron joints, while a jigsaw rounds table corners or cuts curves. A drill press is critical for drilling perpendicular bolt holes in brackets. A router with roundover or bullnose bits adds decorative edges.
Measuring and Clamping Equipment
A tape measure and square ensure 90-degree joints. A band clamp squares up tabletop glue-ups. Standard clamps hold joints during glue drying. A stop block speeds identical leg cuts.
Sanding and Finishing Supplies
An orbital sander with 120, 220, and 400-grit paper handles main surfaces. A sanding block reaches detail work on edges and beads. Steel wool (0000 grade) applies wax finish. A brush or lint-free cloth applies stain and sealant evenly.
Build a Sturdy Tabletop

The tabletop is the foundation of your project. Choose between solid wood planks, plywood, or a segmented panel depending on strength and weight needs.
Solid Wood Plank Method
- Arrange 1-inch-thick planks, 5.5 to 6.5 inches wide, edge to edge.
- Apply wood glue to edges and clamp tightly. Use spacers to protect surfaces.
- Attach 2×4 braces underneath, leaving space for leg folding.
- Trim edges flush with a circular saw and sand smooth.
- Optionally attach 1×4 scrap boards around the edge with pocket screws to hide braces.
Plywood Tongue-and-Groove Method
- Cut plywood to your desired size, such as 40 by 40 inches or 24 by 48 inches.
- Score edges with a marking gauge to prevent veneer tearout.
- Mill 1/8-inch rabbets on all four sides using a 3/8-inch dado stack.
- Cut aprons with matching grooves to capture the tongue.
- Reinforce corners with 1/8-inch thick splines cut at 45 degrees.
Segmented Top Method
- Cut four panels, such as 14.25 by 3.5 inches.
- Attach to a frame using spacers and screws.
- Trim screw heads flush after driving.
Visual cue: Ensure all tabletop joints are tight with no gaps wider than a business card.
Construct and Shape the Legs
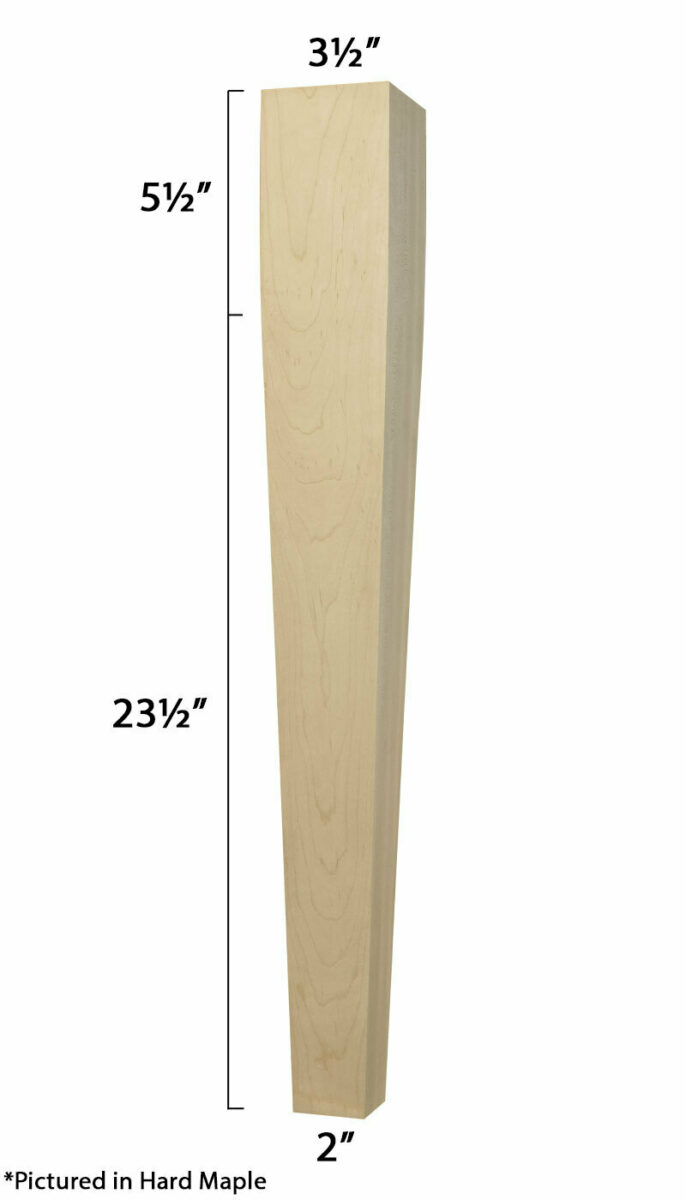
Legs must be strong, properly angled, and designed to fold without binding.
Cut and Taper Legs
For dining tables, use 4×4 legs 27.5 inches long, which adds up to 30 inches with the top and frame. For lightweight tables, 2×2 or laminated 3/4-inch boards ripped to 2 inches work well. Tapering creates a vintage look: cut a 1-inch taper over 12 inches using a taper jig on a table saw. Round top edges with a 7/8-inch radius on a band saw, then soften with a 3/16-inch roundover bit.
Prevent Folding Binding
Cut a 45-degree bevel on the top inside corner of each leg. Ensure 1/4-inch clearance between leg and frame when folded. Chamfer feet slightly to prevent snagging on carpets.
Laminated Legs for Custom Width
- Glue two 3/4-inch boards face to face and clamp.
- Let dry completely.
- Fill any nail holes, then rip to your desired width.
Assemble the Frame and Apron

The frame supports the tabletop and houses the folding mechanism.
Cut and Miter Aprons
Cut apron ends at exactly 45 degrees using a miter saw. Test fit: corners should form a perfect 90-degree angle. If joints do not close, adjust the miter angle in half-degree increments.
Reinforce Miter Joints
- Cut 1/8-inch thick splines at 45 degrees.
- Glue and insert into slots in apron ends.
- Clamp until dry. This aligns joints and adds strength.
Add Decorative Beading
Use a bullnose radius bit to create rounded edges on aprons. For a retro look, create three parallel beads by making the first pass with the bullnose bit, adjusting the fence and making a second pass to remove 1/16 inch of material, then using a straight bit to clean grooves between beads.
Attach Apron to Tabletop
Apply wood glue to apron edges and clamp to the tabletop using a band clamp for even pressure. Scrape off glue squeeze-out after 20 minutes when it becomes rubbery. Let cure for 24 hours before sanding.
Install the Folding Mechanism
This is the heart of your folding table. Choose the method that fits your design.
Self-Opening Legs with Spring Tension
- Mount heavy-duty butt hinges to the inner frame corners.
- Attach legs to the other hinge leaf.
- Add tension using a spring, rubber bands, or a counterweight.
- Test deployment and adjust spring tension so legs open smoothly.
- Install a spring-loaded pin or hook to lock legs open.
Warning: Do not overtighten springs. This causes binding.
Self-Locking Brackets
- Drill bolt holes using a drill press to ensure they are perfectly perpendicular. Angled holes jam the locking mechanism.
- Orient legs so tapered sides face inward in the bracket.
- Mount brackets: one side to the leg assembly, the other to the apron underside.
- Test lock: legs should snap into place when opened.
- Add a hook or magnetic catch to keep legs folded during storage.
Pro Tip: Label bracket positions with pencil before drilling.
Hinge-and-Pin Folding Frame
- Attach two hinges to the inside of the frame on opposite sides.
- Insert hinge pins to connect frame halves.
- Add corner braces inside the frame for rigidity.
- Install a small hook or bolt to lock the table flat when open.
Dowel Handle System
- Drill 7/8-inch holes in supports and legs.
- Insert a 2-inch dowel (7.125 inches long) as a handle. Do not glue it.
- Glue 1.5-inch dowel spacers on one side only to allow movement.
- The handle extends to support the tabletop when open and folds flat when stored.
Sand and Finish Like a Pro
A smooth finish protects the wood and elevates the appearance.
Follow This Sanding Sequence
- 120-grit: Removes tool marks and flattens surfaces.
- 220-grit: Smooths to the touch.
- Detail sand: Wrap sandpaper around a stick to reach between apron beads.
- 400-grit: Light scuff between finish coats.
Choose the Right Finish
| Use Case | Finish | Application |
|---|---|---|
| Indoor | General Finishes Arm-R-Seal (satin) | Wipe on 3 coats, 8 hours apart |
| Outdoor | Clear stain or wipe-on poly | Reapply annually |
| Natural look | Paste wax | Apply with 0000 steel wool, buff with cloth |
Pro Tip: Apply finish before final assembly to reach tight areas.
Protect Floors
Attach adhesive-backed felt pads to leg bottoms. Use black metal caps on handle ends for durability.
Troubleshoot Common Build Problems
Even expert builds face issues. Here is how to fix them fast.
Legs Will Not Lock
Cause: Bolt holes are not perpendicular.
Fix: Redrill using a drill press or drill guide. Never freehand.
Gaps in Miter Joints
Cause: Inaccurate 45-degree cuts.
Fix: Recalibrate your miter saw. Use splines to bridge gaps.
Table Binds When Folding
Cause: Leg hits the frame.
Fix: Add a 45-degree bevel to leg tops. Ensure 1/4-inch clearance.
Warping or Cupping
Cause: Uncured or unacclimated wood.
Fix: Use kiln-dried lumber. Mill 1/8 inch oversize and let sit for 7 days.
Plywood Tearout
Cause: Cutting across veneer grain.
Fix: Score the cut line with a utility knife or marking gauge first.
Optimize for Strength and Portability
Make your table both durable and easy to move.
Reduce Weight
Use sassafras instead of oak. Choose plywood over solid wood for large tops. Use 1×2 framing instead of 2x4s where possible.
Boost Strength
Laminate legs for added stability. Use reinforced hinges for heavy loads. Add metal corner braces at stress points.
Enhance Aesthetics
Taper legs for a mid-century modern look. Apply a three-bead apron for vintage charm. Let cedar age naturally for a silver-gray patina.
Save Time
Use a stop block on the miter saw for identical leg cuts. Pre-finish parts before assembly. Use a band clamp for faster glue-ups.
Maintain Your Folding Table
With minimal care, your table will last for years.
Cleaning
Wipe with a damp cloth. Avoid harsh cleaners on waxed or oiled finishes.
Storage
Store folded flat in a dry place. If kept outdoors, elevate off the ground and cover.
Annual Maintenance
Reapply wax or sealant to maintain water resistance. Tighten bolts and screws. Wood can shift over time, so periodic checks prevent wobble.
Frequently Asked Questions About Building a Folding Table
What is the easiest folding table design for beginners?
The hinge-and-pin compact table is the easiest design for beginners. It uses simple butt hinges or removable pins to fold the table in half. This design requires only basic tools and can be completed in under 3 hours.
What wood is best for a portable folding table?
Sassafras is the best choice for portable tables because it looks like white oak but weighs 20 percent less. Cedar works well for outdoor tables due to its natural rot resistance. Cherry is ideal for indoor dining tables because of its rich, warm color.
How do I prevent my folding table legs from binding?
Cut a 45-degree bevel on the top inside corner of each leg. Also ensure 1/4-inch clearance between the leg and frame when folded. This prevents the legs from hitting the frame during opening and closing.
Do I need a drill press to build a folding table?
A drill press is highly recommended for installing self-locking brackets because the bolt holes must be perfectly perpendicular. Angled holes cause the locking mechanism to jam. For simpler designs with hinges, a quality hand drill with a drill guide can work.
How long does it take to build a folding table?
Build time depends on the design complexity. A simple hinge-and-pin table takes under 3 hours. A self-locking bracket dining table takes 3 to 5 hours. A self-opening spring mechanism design requires 4 to 6 hours due to the additional hardware.
Can I use plywood for the tabletop?
Yes, plywood works well for tabletops and is more affordable than solid wood. Use exterior-grade plywood for outdoor projects. For a premium look, use cherry-veneered plywood. Score the cut lines before cutting to prevent veneer tearout.
Key Takeaways for Building Your Own Folding Table
Building a folding table is a rewarding project that combines function, craftsmanship, and smart design. The three main design styles each serve different needs: self-opening mechanisms for convenience, self-locking brackets for heavy-duty stability, and hinge-pin systems for simplicity and speed.
The key to success lies in precision during two critical stages. First, cut accurate 45-degree miter joints for the frame and apron. Second, drill perpendicular bolt holes when installing self-locking brackets. These steps prevent the most common problems: gaps in corners and legs that will not lock.
Material selection matters as much as technique. Sassafras provides strength without weight. Cedar handles outdoor conditions naturally. Self-locking brackets paired with 4×4 legs create furniture that feels permanent yet folds in seconds.
Now that you understand how to build a folding table, you are ready to create a piece that is not just useful but uniquely yours. Start with a simple design, master the basics, and progress to more complex mechanisms as your skills develop. Your perfect folding table is waiting.