How to Clean a Coffee Table
A coffee table endures a lot of daily wear. Hot cups, casual snacks, resting feet, and scattered remotes all leave their mark over time. Learning how to clean a coffee table properly protects its finish and keeps it looking beautiful for years. But rushing in with the wrong cleaner or too much water can cause permanent damage like clouding, warping, or sticky buildup.
This guide walks you through every step, from identifying your wood finish to removing tough water rings and preventing long-term damage. Whether your table has a glossy sealed surface or a natural oiled finish, you will find the right techniques and solutions here.
Identify Your Coffee Table’s Wood Finish First
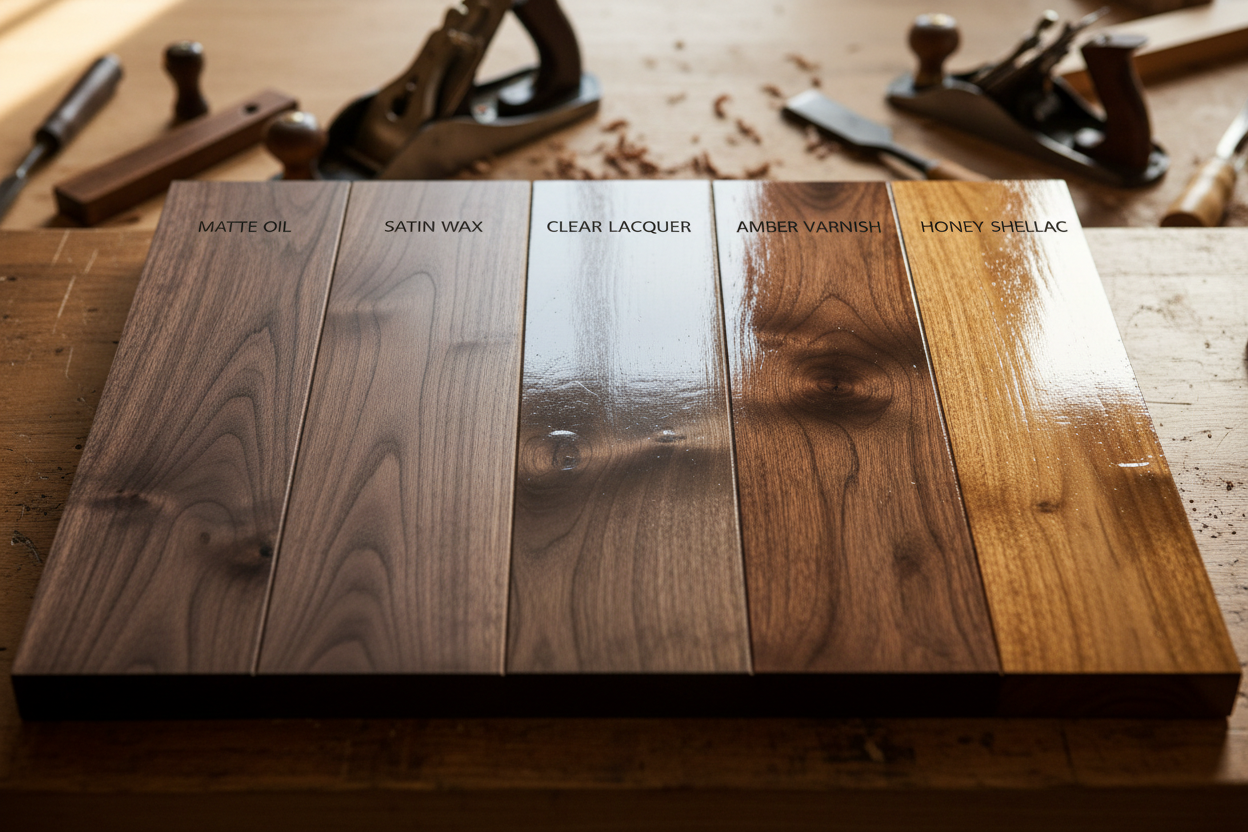
Before applying any moisture or cleaner, you must determine what type of finish your table has. Using the wrong approach can cause permanent clouding or stripping.
Perform the Water Drop Test
Place a single drop of water on an inconspicuous area such as the underside or back edge. Watch what happens.
If the water beads up and sits on the surface, you have a sealed finish like polyurethane, lacquer, or varnish. This type can tolerate a lightly damp cloth. If the water soaks in and darkens the wood immediately, you are dealing with oiled, waxed, or unfinished wood that absorbs moisture like a sponge.
Use Visual and Touch Cues
Look at the surface sheen. A glossy or satin appearance typically indicates a sealed finish. A matte, warm, natural look suggests oil or wax. Run your hand across the surface. A hard, plastic-like feel points to polyurethane or lacquer, while a smooth, natural feel indicates an oil or wax finish.
When in doubt, treat the table as oiled or unfinished. This conservative approach prevents water damage that cannot be undone.
Gather the Right Tools and Cleaning Solutions
Having the proper supplies prevents scratches and ensures effective cleaning without damaging the finish.
Essential Tools
You will need three microfiber cloths. One is for dry dusting, one for damp cleaning, and one for immediate drying. A soft-bristle brush helps dislodge dust from carvings and corners. A vacuum with a soft brush attachment removes deep debris before wet cleaning. A plastic scraper lifts sticky residue without scratching. Keep a white cloth handy specifically for heat mark removal.
Safe Cleaning Solutions
The mild soap solution works best for weekly cleaning. Mix one teaspoon of mild dish soap with one cup of warm water. Apply to your cloth, never directly to the wood.
The vinegar solution cuts through grease effectively. Mix one part white vinegar with three parts water. Use this sparingly because the acidity can dull finishes over time.
For dark water rings, mix equal parts three percent hydrogen peroxide with water. Dampen a cloth, place it over the stain, and leave it overnight.
For deep stains, mix two tablespoons of oxalic acid crystals with six tablespoons of warm water. Wear gloves when handling this solution.
Cleaners to Avoid
Never use ammonia, bleach, or Windex. These strip finishes and cause hazing. Avoid silicone-heavy polishes that create sticky buildup. Skip steel wool or abrasive pads that scratch the surface. Never apply cleaning solutions directly to the wood.
Follow This Step-by-Step Cleaning Routine
Follow this sequence for safe and effective cleaning every time.
Clear and Dry Dust First
Remove all items from the table including books, decor, and coasters. Wipe the entire surface with a dry microfiber cloth, working with the grain. Use a soft brush or vacuum to clean crevices and legs.
This step matters because dry dust acts like sandpaper when wet. Skipping it creates micro-scratches.
Damp Clean Only Sealed Finishes
Dip a microfiber cloth into the mild soap solution and wring it until it stops dripping. The cloth should feel barely damp with no free water. Wipe in straight lines following the grain. Immediately dry each section with a clean cloth before moving to the next area.
Never let water sit on the surface. Even twenty minutes can cause swelling or white spots to appear.
Buff and Inspect
Check seams, edges, and joints for trapped moisture. Wipe dry if needed. For extra shine, apply wood-safe polish sparingly and buff with a clean cloth. Avoid over-polishing because buildup attracts dust and creates stickiness.
Remove Common Stains from Your Coffee Table
Different stains require different approaches. Here is how to tackle each type safely.
Fix White Water Rings
White rings indicate moisture trapped under the finish. Try the iron method. Place a clean white cloth over the ring and iron on low heat for five to ten seconds. Check progress and repeat if needed.
Alternatively, apply a small amount of mayonnaise or petroleum jelly to the ring, wait five minutes, then wipe clean. Non-gel toothpaste also works. Rub gently in circles, wipe clean, and dry thoroughly.
Treat Dark Water Stains
Dark rings mean moisture has penetrated deeper. Soak a cloth in the hydrogen peroxide solution, lay it over the stain, leave it overnight, and dry completely. For severe cases, apply the oxalic acid solution with a soft brush, let sit for one hour, wipe with warm water, and dry. Deep stains may require sanding and refinishing.
Clean Grease and Food Spills
Always blot spills immediately. Never wipe because that spreads grease. For fresh spills, use soapy water and a soft cloth. For stubborn grease, mix olive oil and vinegar or create a baking soda paste. Apply, let sit, then wipe clean.
Remove Oil Stains
For fresh spills, cover immediately with baking soda, cornstarch, or flour. Let it absorb the oil, then wipe away. Clean residue with warm soapy water.
For set-in stains, make a paste of baking soda and white vinegar. Apply to the stain, rub gently, let sit for several hours, then wipe clean and dry.
For old or stubborn stains, use mineral spirits on a soft cloth. Test in a hidden spot first because it can dull unfinished wood.
Erase Ink Marks
For ballpoint pen, dab with rubbing alcohol on a cotton ball. Blot, do not rub. Repeat until the ink lifts, then wipe with a damp cloth.
For permanent marker, try the baking soda paste or mineral spirits method described above.
Handle Mold Growth
Wipe affected areas with diluted vinegar or mild soap. Dry completely and improve airflow around the table. If mold returns or penetrates the grain, consult a professional. Deep mold compromises structural integrity.
Hide Light Scratches
For light scratches on dark wood, rub a walnut half directly over the mark. The natural oils fill the groove. For deeper scratches, use a color-matched wood touch-up marker.
Fix a Sticky or Buildup-Prone Coffee Table

If your table feels tacky after cleaning, old polish or wax buildup is likely the culprit.
How to Remove Stickiness
Wipe with mild soap and water, then dry immediately. If stickiness persists, use the vinegar solution or a finish-safe cleaner designed to cut buildup. Wipe repeatedly until the surface feels smooth, not tacky. Dry thoroughly after each pass.
Stop using heavy polishes going forward. Opt for light conditioning instead and apply sparingly.
Maintain Your Coffee Table for Long-Lasting Beauty
Regular maintenance prevents damage before it happens.
Stick to a Cleaning Schedule
Blot spills immediately every time. Dry dust with a microfiber cloth weekly. Damp clean monthly if your table has a sealed finish. Re-oil oiled or unfinished wood every six to twelve months.
Protect Your Table Daily
Always use coasters and felt pads under decor and items. Keep the table away from direct sunlight to prevent fading and drying. Position it away from heat sources like radiators and fireplaces. Maintain stable humidity because wood expands and contracts with moisture changes.
Re-Oil When Needed
Signs that wood needs oil include dullness, dryness, or a rough feel. Use food-grade wood oil like tung or mineral oil. Apply, let soak for at least one hour, then buff off excess. Sealed polyurethane or lacquer finishes do not need oiling.
When to Use Stronger Cleaning Methods

Some situations call for more aggressive approaches, but always test first.
Simple Green works on heavy buildup. Spray on the affected area, let sit for ten minutes, then scrub with a soft brush dipped in hot water. This may dull delicate finishes so test first.
Magic Eraser removes scuff marks effectively. It acts as a mild abrasive, so test on a hidden area before using it on the main surface.
Nail polish remover contains acetone and works only on nail polish stains. Apply to the specific spot, wipe quickly, and dry immediately. This can strip finishes so use with caution.
Undo Cleaner offers a non-toxic option for removing marks without damaging wood.
Avoid These Common Cleaning Mistakes
Many damage problems stem from simple errors that are easy to prevent.
Using too much water causes warping, clouding, and structural damage. Always wring your cloth until barely damp and dry immediately.
Wiping against the grain pushes dirt into wood lines and creates micro-scratches. Always wipe parallel to the grain.
Using abrasive pads leaves permanent scratches in the finish. Use only soft microfiber cloths or soft-bristle brushes.
Over-polishing creates sticky, gummy buildup that attracts dust. Polish sparingly and clean buildup with vinegar or a gentle stripper.
Ignoring spills lets stains set permanently and water rings form. Blot and clean spills immediately.
Using ammonia or bleach strips finish and causes hazing or discoloration. Stick to pH-neutral soap or wood-specific cleaners.
Frequently Asked Questions About Cleaning Coffee Tables
What is the best cleaner for wood coffee tables?
A mixture of mild dish soap and warm water applied with a barely damp microfiber cloth is the safest and most effective option for regular cleaning.
Can I use vinegar on my wood coffee table?
Yes, but only when diluted. Mix one part vinegar with three parts water. It cuts grease well but is acidic, so avoid daily use on sealed finishes.
How do I remove a white water ring from my coffee table?
Try the iron method with a clean cloth over the stain, or apply mayonnaise briefly. For dark rings, use a hydrogen peroxide compress overnight.
Why does my coffee table feel sticky after cleaning?
This is usually caused by layers of old polish or silicone-based sprays building up. Clean with diluted vinegar or a finish-safe stripper and stop using heavy polishes.
How often should I oil my wood coffee table?
Re-oil oiled or unfinished wood every six to twelve months or whenever the wood looks dry. Sealed wood does not need oiling.
Is toothpaste safe for coffee tables?
Non-gel toothpaste can gently remove light heat marks or white rings. Avoid gel types or those with heavy abrasives.
What should I do if mold appears on my coffee table?
Wipe with diluted vinegar or mild soap, dry thoroughly, and improve air circulation. If mold penetrates the grain or returns, seek professional restoration.
Key Takeaways for Cleaning Your Coffee Table
Cleaning a coffee table properly preserves its beauty and extends its life. Always identify the finish type before using any moisture. Use the water drop test when uncertain. Gather the right tools including microfiber cloths and mild soap solution. Follow the dry-then-damp cleaning sequence every time. Treat spills immediately and avoid letting water sit.
For stains, match the solution to the problem. White rings respond to heat or mayonnaise. Dark rings need hydrogen peroxide or oxalic acid. Grease requires blotting and soap. Oil stains need absorbent powders or mineral spirits.
Maintain your table with coasters, felt pads, and regular dusting. Re-oil unfinished wood every six to twelve months. Avoid common mistakes like too much water, wiping against the grain, and over-polishing.
With these techniques, you can keep your coffee table looking its best for years to come. Start with the gentlest methods and escalate only when necessary. Your table will thank you with lasting beauty and functionality.