How to Polish a Wood Table
Is your wood table looking dull, lifeless, or covered in light scratches? Over time, even the most beautiful hardwood surfaces lose their luster due to daily wear, dust buildup, and exposure to sunlight. But the good news is that polishing a wood table properly can restore its rich color, enhance the grain, and protect it for years to come. Whether you’re maintaining a cherished family heirloom or refreshing a modern dining table, the right technique makes all the difference.
Polishing isn’t just about shine. A well-applied polish nourishes the wood, fills in micro-scratches, and creates a barrier against spills, heat, and daily use. But one mistake like using too much oil or polishing against the grain can leave your table sticky or scratched. The key is knowing your wood type, choosing the right polish, and following a precise, step-by-step process.
Clean the Surface Before Polishing
:max_bytes(150000):strip_icc()/how-to-clean-wood-furniture-5181301-hero-a713271737af4f639c859b5084f0da7d.jpg)
Before any polish goes on, the table must be free of dust, grime, and old buildup. Applying polish over dirt locks contaminants into the finish, causing a cloudy or streaky result.
Dust Weekly to Prevent Scratches
Start with a soft feather duster or dry microfiber cloth to lift loose particles. Always move with the grain, never scrub. Dust contains tiny abrasive particles that scratch wood when rubbed aggressively. A weekly dusting prevents this damage and keeps the surface ready for deeper cleaning when needed.
Remove Grime With a Mild Cleaner
For sticky spots or accumulated oils from hands and food, use a mild detergent mixed with warm water. Dip a lint-free cloth into the solution, wring it until barely damp, and wipe the surface following the grain. Never soak the wood. Murphy’s Oil Soap is a trusted option for deeper cleaning. After wiping, immediately dry with a second clean cloth to prevent moisture damage. For carved details or grooves, use a soft-bristled brush or cotton swab to reach tight spots.
Strip Buildup on Dull Finishes
If the table looks cloudy or feels rough, years of wax or silicone polish may have built up. Use a wood-safe degreaser or anti-buildup cleaner to strip this layer. Apply with a cloth, work in sections, and buff clean. Avoid silicone-heavy cleaners if buildup is the issue because they will make it worse.
Sand the Table for Restoration
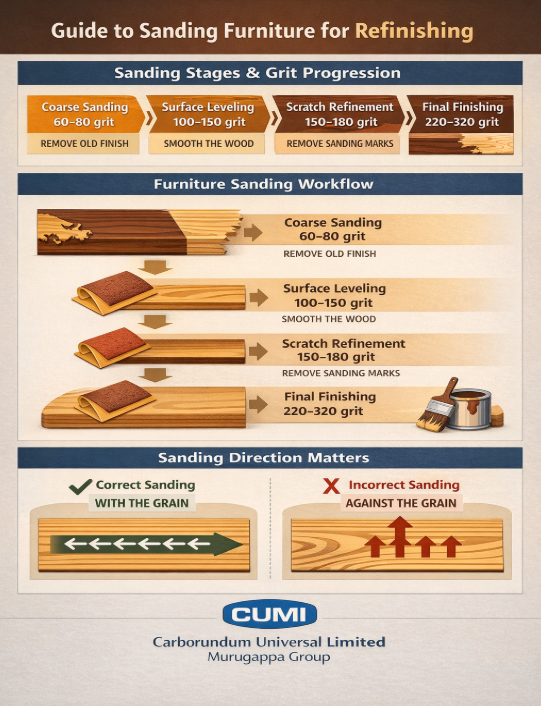
Polishing works best on a smooth, even surface. If the finish is scratched, uneven, or worn down to bare wood, light sanding prepares the table for a flawless polish.
Use 180-Grit Then 320-Grit Paper
Begin with 180-grit sandpaper to smooth out minor imperfections. Wrap the paper around a sanding block for even pressure. Sand in straight lines following the grain, one section at a time. Once the surface feels uniformly smooth, switch to 320-grit sandpaper to create a fine, matte finish. Stop when the wood appears evenly lightened and a fine dust forms.
Remove All Sanding Dust
After sanding, no visible dust should remain. Use a tack cloth, a sticky lint-free fabric that lifts fine particles without scratching. Wipe gently with the grain. A regular cloth may push dust around. A tack cloth pulls it out. This step is critical because any leftover grit will ruin the final polish.
Apply Wax Polish Like a Professional
Wax polish delivers deep nourishment and a warm lasting shine, ideal for hardwoods like oak, walnut, and cherry.
Choose High-Quality Paste Wax
Opt for trusted brands like Philly Supreme, Potter Polish, or Old English. These contain natural waxes and oils that penetrate and protect. Avoid silicone-heavy polishes if you plan to refinish later because they can interfere with adhesion.
Load a Stockinette Cloth Properly
Use a woodly stockinette cloth. Its soft stretchy fibers hold wax evenly and prevent clumping. Dunk the cloth into the wax, twist it tightly, and knead until the wax spreads through the fabric. Alternatively, place a spoonful of paste wax on the cloth and work it in by hand.
Work in Small Sections
Divide the table into 10 to 12 inch strips. Apply wax using circular motions first, then with the grain, to ensure full penetration. The wood will darken as it absorbs the oils. Do not worry about excess because it will be removed later. Let the wax haze over, usually 10 to 15 minutes. This allows time for deep conditioning.
Buff to a High Shine
Switch to a clean microfiber cloth. Buff each section with firm circular pressure. The friction generates heat, melting the wax into a smooth non-tacky finish. Keep buffing until the surface feels warm and slick. For large tables, attach a soft cloth to a power drill for faster consistent results. Finish with a wool duster to remove any airborne lint.
Try Natural DIY Polishes
For routine maintenance or non-toxic cleaning, homemade polishes condition wood and remove light grime.
Mix Olive Oil and Vinegar
Combine 3 parts olive oil with 1 part white vinegar in a spray bottle. Add 10 drops of lemon essential oil for fragrance. Shake well before each use. Spray onto a microfiber cloth, never directly on the wood. Wipe in circles, then go over with a dry cloth to remove excess. The vinegar cleans while the oil conditions. Use every 3 to 6 months. Do not overuse because oil can turn rancid or attract dust if applied too frequently.
Use Lemon Juice and Oil for Shine
Mix 2 parts olive oil with 1 part fresh lemon juice. Apply the same way. The citric acid gently cleans and brightens the surface, giving a natural luster. This method works best for pine or lighter woods.
Apply Beeswax and Mineral Oil
For long-term protection, melt beeswax into mineral oil in a 1 to 4 ratio and apply a thin coat. Buff after 30 minutes. This combo seals the wood and resists water rings.
Repair Scratches and Stains

Polishing enhances the surface, but first fix visible damage.
Fix Minor Scratches With a Marker
Use a color-matched wood touch-up marker. Choose a shade slightly lighter than the table because dark marks stand out more. Test on a hidden area first. Dab the marker into the scratch and let it dry completely. Wipe lightly with a cloth to blend.
Fill Deep Scratches With Wax Stick
For gouges, press a wax repair stick into the scratch. Scrape off excess with a plastic putty knife. Then color over it with a touch-up marker. Buff the area with polish to match the surrounding finish.
Remove White Water Rings
White rings are moisture trapped in the finish, not the wood. Act fast with a specialized ring-removal cloth. Rub gently in circles until the haze fades. If unavailable, lightly buff the area with a Scotchbrite pad along the grain. Avoid heat methods unless specified by the product.
Treat Dark Water Stains
If water penetrated the wood, surface fixes will not work. The stain is deep and may require professional refinishing or sanding down to bare wood. Do not attempt aggressive sanding on antiques.
Prevent Future Damage
A polished table stays beautiful only with proper care.
Use Coasters and Trivets Always
Never place hot dishes, wet glasses, or sharp objects directly on the surface. Coasters, trivets, and table mats are essential. Felt pads under lamps and decor prevent scratches.
Avoid Heat and Sunlight
Keep the table away from radiators, heaters, and direct sunlight. UV rays fade finishes, and heat causes warping and cracks. Use blinds or curtains to reduce exposure.
Control Humidity Levels
Wood expands and contracts with moisture. In dry climates, use a humidifier. In damp areas, use a dehumidifier. Stable humidity prevents splitting and warping.
Follow a Maintenance Schedule
Regular care prevents the need for intensive restoration.
Weekly Dust With Microfiber
Use a soft dry cloth or feather duster. For light fingerprints, a Scotchbrite pad used gently with the grain refreshes the surface.
Monthly Clean With Wood-Safe Solution
Wipe with Murphy’s Oil Soap or a mild soap mix. Dry immediately. Avoid overspray on joints or undersides.
Re-Polish Every 3 to 6 Months
Reapply wax or oil polish depending on use. High-traffic tables may need it every 3 months. Occasional-use pieces may need it every 6 months. For waxed tables, avoid silicone polishes because they build up and create haze. Stick to wax-free or natural options for maintenance.
Know When to Call a Professional
Some issues go beyond DIY fixes.
Antique or Valuable Furniture
If the table is an antique or valuable piece, do not attempt deep sanding or staining. Consult a professional restorer to preserve its value.
Extensive Finish Damage
Peeling, flaking, or bubbling finish means the protective layer has failed. This requires complete refinishing, sanding, staining, and sealing, best done by experts.
Deep Gouges or Structural Cracks
If the wood is split or deeply gouged, repair involves wood filler, clamping, or veneer replacement. DIY attempts can worsen the damage.
Choose the Right Tools and Products

Using the correct materials ensures success and prevents harm.
Use These Recommended Items
Polishes like Philly Supreme, Potter Polish, Old English, and Amish Oil. Cleaners like Murphy’s Oil Soap, mild detergent, and dedicated wood cleaners. Cloths like microfiber, 100% cotton, and stockinette. Abrasives like 180-grit and 320-grit sandpaper, Scotchbrite pad, and tack cloth. Tools like soft brush, cotton swabs, and plastic putty knife.
Avoid These Common Mistakes
Avoid steel wool unless stripping the entire finish. Avoid metal scrapers because they can gouge wood. Avoid harsh chemicals like ammonia or bleach. Avoid spraying polish directly on wood because it causes pooling. Avoid polishing against the grain because it creates scratches.
Frequently Asked Questions About Polishing a Wood Table
What is the best way to polish a wood table without leaving streaks?
Apply polish to a cloth first, never directly on the wood. Work in small sections using circular motions followed by grain direction. Buff thoroughly with a clean microfiber cloth until the surface feels smooth and non-tacky.
How often should I polish my wood table?
Polish high-traffic tables every 3 months. Tables used occasionally can go 6 months between polishings. Dust weekly and clean monthly to maintain the finish between polishings.
Can I use olive oil to polish my wood table?
Yes, olive oil conditions wood effectively. Mix 3 parts olive oil with 1 part white vinegar for cleaning and polishing. Apply with a microfiber cloth and buff dry. Use this method every 3 to 6 months for best results.
What causes white water rings on wood tables and how do I fix them?
White rings form when moisture gets trapped in the finish, not the wood itself. Use a specialized ring-removal cloth and rub gently in circles. A light buff with a Scotchbrite pad along the grain also works for surface-level rings.
Should I sand my wood table before polishing?
Sand only if the finish is scratched, uneven, or worn to bare wood. Use 180-grit followed by 320-grit sandpaper. Always sand with the grain and remove all dust with a tack cloth before polishing.
What should I avoid when polishing wood furniture?
Avoid using too much polish because it creates sticky buildup. Never polish against the grain. Skip cleaning before polishing because dirt becomes locked into the finish. Avoid silicone-heavy polishes if you may refinish later.
Key Takeaways for Polishing Your Wood Table
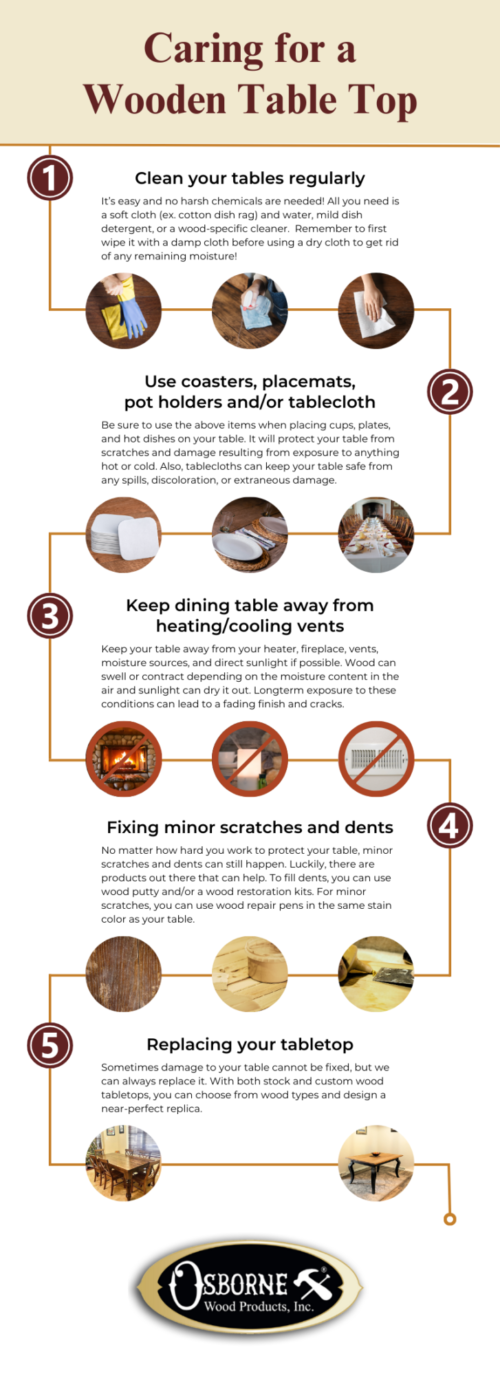
Polishing a wood table is a straightforward process when you follow the right steps. Always clean the surface thoroughly before applying any polish. Remove dust, grime, and old buildup first because polishing over contaminants causes hazy finishes. Test any product in an inconspicuous area before using it on the entire table.
Choose your polish based on your wood type and desired results. Paste wax provides deep nourishment and lasting shine for hardwoods. Natural DIY solutions like olive oil and vinegar work well for routine maintenance. Whatever method you choose, work in small sections and always buff to a smooth finish.
Protect your newly polished table from future damage. Use coasters, trivets, and felt pads under all objects. Keep the table away from direct sunlight and heat sources. Control humidity levels to prevent warping and cracking.
Maintain your table with consistent care. Dust weekly, clean monthly, and re-polish every 3 to 6 months depending on use. This routine prevents the need for intensive restoration and keeps your table looking its best for years to come.