How to Finish a Wood Table
You’ve built or restored a beautiful wood table, but the final step determines whether it becomes a stunning centerpiece or a disappointing disappointment. How to finish a wood table properly is the difference between a surface that looks professionally done and one that shows every flaw. The right finish protects your work from spills, scratches, and daily wear while enhancing the natural grain and color of the wood.
This guide walks you through every step from sand to seal. You’ll learn proper surface preparation, how to choose between polyurethane and hardwax oils, application techniques that prevent bubbles and streaks, and maintenance tips that keep your table looking great for decades.
Sand Perfectly Before Finishing
No finish can hide sanding mistakes. It only amplifies them. A smooth, scratch-free surface is the foundation of a professional-looking finish, and most experts agree that sanding accounts for about 70% of the final result.
Start with the Right Grit Progression
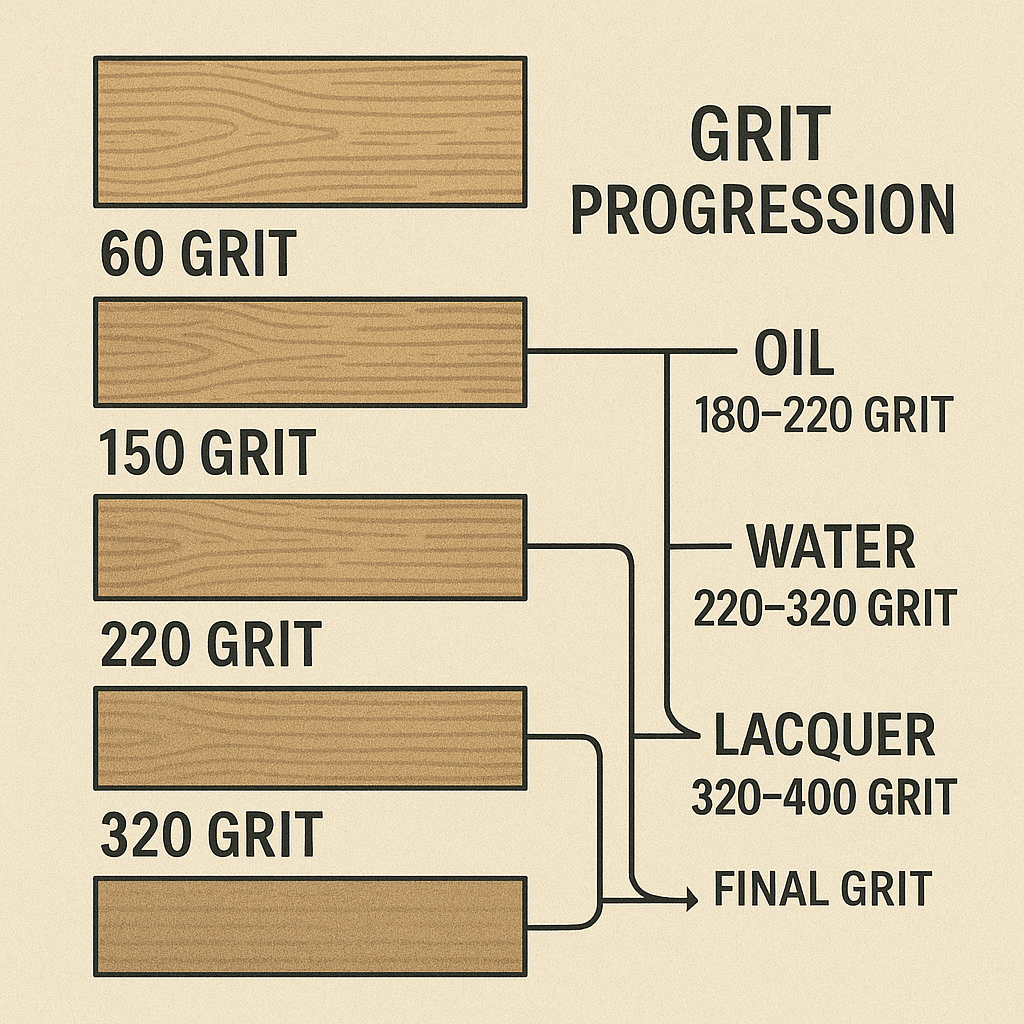
Begin with coarse enough grit to remove planer marks or old finish. For wood coming straight from a planer, start at 100-grit. Move sequentially through 120, 150, and optionally 180. Never skip more than one grit, as this leaves deep scratches visible after finishing.
Your final grit depends on the finish type you plan to use. For polyurethane or stain, finish at 180 or 220-grit. For hardwax oils like Rubio Monocoat, stop at 180-grit maximum. Sanding finer closes the wood pores, blocking oil penetration and potentially voiding warranty protection.
Sand With the Grain
Always sand in the direction of the grain to avoid cross-grain scratches. When using a random orbital sander, vary your motion slightly between passes to prevent patterned swirls. Angle the sander 10-15 degrees between passes, but never sand against the grain.
A helpful tip is to draw a light pencil grid on the wood surface. As you sand, the lines disappear evenly, showing you haven’t missed spots.
Use Quality Tools and Sandpaper
Hand sanding offers the best control for final passes and prevents over-sanding. Random orbital sanders are efficient and safe when used carefully, but avoid belt or palm sanders which are too aggressive for furniture finishing.
For sanders, the Makita BO5041 (around $60) works well for hobbyists, while the Festool ETS 150/3 (around $400) suits professionals. Never use cheap sandpaper. Low-quality abrasives clog quickly and leave uneven finishes. Invest in high-grade paper like Mirka or 3M Cubitron II.
Always attach a HEPA vacuum to your sander. It removes dust instantly, improving visibility and air quality.
Raise the Grain for a Flawless Final Surface
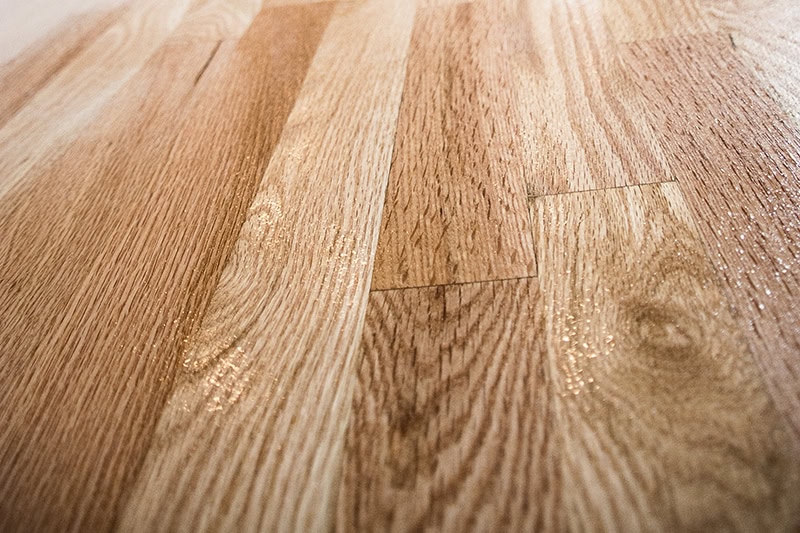
Even after thorough sanding, wood fibers lie flat beneath the surface. When you apply any liquid like stain or oil, these fibers swell and stand up, creating a rough, fuzzy feel. This technique, called water popping, prevents that problem.
Water Pop Between Each Grit
Most finishing guides suggest water popping only before the final coat. Professional woodworkers do it after every grit change for superior results. Dampen the surface with a wet rag or spray bottle, then let it dry completely, which takes 1-2 hours. Lightly sand with the next grit to knock down the raised fibers.
This multi-stage approach delivers glass-smooth results impossible to achieve with a single water pop at the end.
Clean Thoroughly Before Any Finish
Dust, oils, and residues block adhesion. A clean surface is essential for the finish to bond properly and look uniform.
Remove Dust and Debris
Blow off dust with compressed air, then wipe with a tack cloth or microfiber rag. Vacuum crevices and edges thoroughly.
Wipe with the Correct Solvent
Use a cleaner compatible with your finish type. Rubio Monocoat users should use Rubio Raw Wood Cleaner or acetone. Other oil finishes work well with acetone or denatured alcohol. Polyurethane users can use mineral spirits if the manufacturer allows it.
Never use household cleaners. They leave films that prevent proper bonding. Let the solvent evaporate fully before proceeding, usually 15-30 minutes.
Prevent Blotchy Stains on Softwoods
Pine, poplar, and alder absorb stain unevenly, creating splotchy patches that ruin the look. Fix this before applying stain.
Apply Wood Conditioner First
Conditioner pre-seals the pores so stain absorbs uniformly across the surface. Match the base of the conditioner to your stain: oil conditioner for oil stain, water-based for water-based stain.
Apply evenly with a brush or rag, then wait 15 minutes to 2 hours. Don’t let it dry completely, but don’t apply stain while it’s still wet either, as this dilutes the color and causes streaks. Wipe off excess if needed, then test on scrap wood to verify even absorption.
Apply Stain for Even Color
Stain adds depth and character to wood, but only when applied correctly. Rushing or using wrong techniques creates streaks and uneven color.
Choose the Right Tools
Use natural bristle brushes for oil-based stains and synthetic brushes for water-based stains. Rags work well for wiping off excess, but avoid foam applicators which can leave lint. Skip aerosol cans for large surfaces, as they’re hard to control.
Work in Small Sections
Stir the stain thoroughly before use, but never shake the can as this creates bubbles. Apply liberally with a brush, working into the grain. Let it sit 10-15 minutes for deeper color, then wipe off excess with a lint-free cloth, always moving with the grain.
Overlap sections while the edge is still wet to avoid lap marks.
Add a Second Coat If Needed
For deeper color, apply a second coat after 8-24 hours, checking the manufacturer’s recommendations. Oil-based stains need longer drying time between coats.
Choose the Right Finish for Your Table
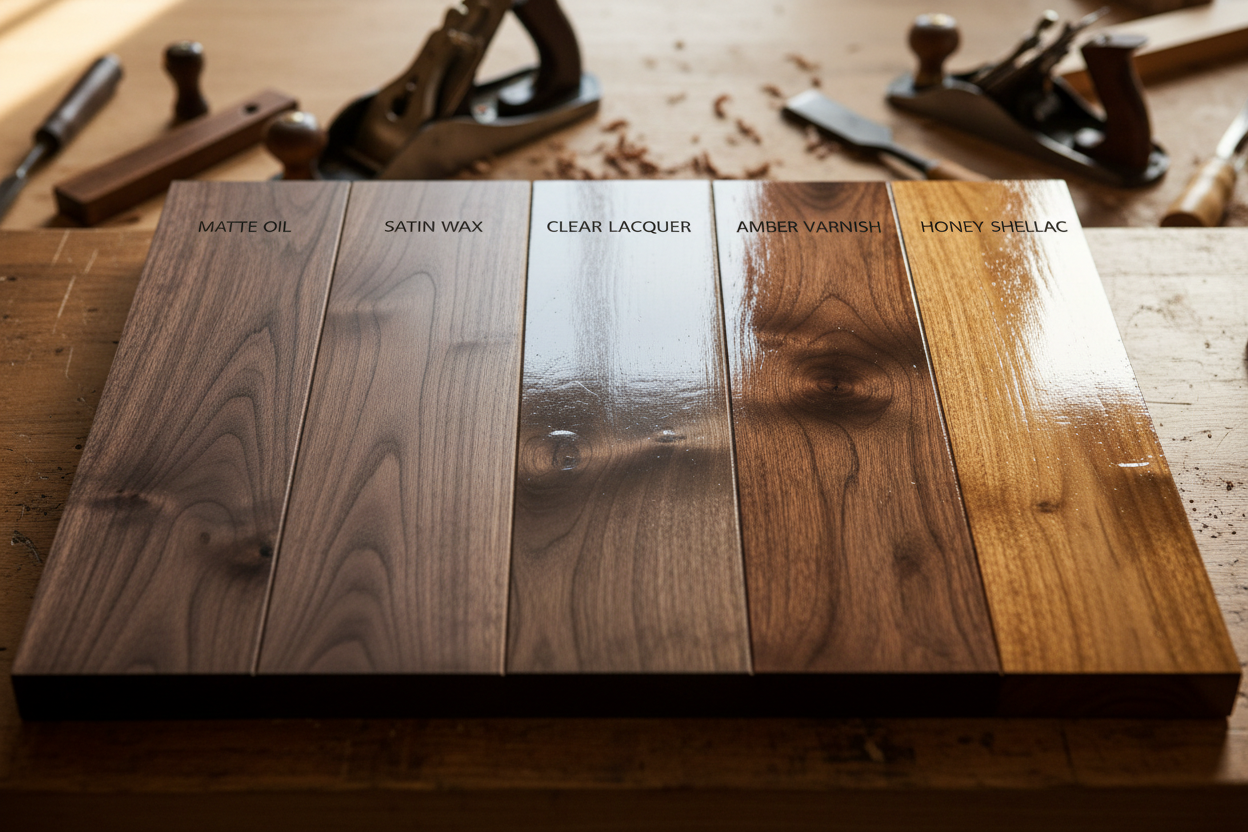
Not all finishes perform the same way. Match the finish to your table’s use, location, and the look you want to achieve.
Polyurethane: Maximum Protection
Polyurethane creates a hard, plastic-like film on top of the wood, providing excellent barrier protection.
Oil-based polyurethane offers a warm amber glow, very high durability, but slow drying of 24+ hours per coat and strong odor. Water-based polyurethane stays clear without color shift, dries in 2-4 hours, and has low odor, though it’s slightly less durable.
Wipe-on poly is a thinned formula that’s easier to apply with fewer bubbles and gives a hand-rubbed look. This is the method recommended by experts like Norm Abram.
Polyurethane works best for dining tables, children’s furniture, and outdoor pieces (use spar urethane for outdoors).
Hardwax Oils: Natural Feel, Easy Repair
Hardwax oils penetrate the wood and bond chemically rather than sitting on top like a film. This preserves the natural feel and texture of the wood.
Rubio Monocoat is extremely durable and repairable with a matte finish. It covers approximately 20 square feet per 30ml and cures in 3 weeks (1 week with accelerator). Osmo offers similar results but may show water spots over time. Odie’s Oil shows inconsistent results with some pieces drying out in weeks.
You must sand to 180-grit maximum for these finishes. Finer grits block oil penetration.
These finishes work best for indoor tables where touch and texture matter. Avoid placing hot pans directly on oil-finished surfaces.
Shellac: Classic Look, Limited Use
Shellac is a natural resin dissolved in alcohol that provides a beautiful warm tone and easy repairs. However, it’s not heat or water resistant and dries in about 30 minutes.
Shellac works best for antique restoration and low-traffic furniture.
Lacquer: Fast and Tough
Lacquer is a spray-on resin that dries to a hard, glossy, heat-resistant finish. It dries in 15-30 minutes but requires proper ventilation or a respirator. Brushable versions are available for those without spray equipment.
Lacquer suits professional builds needing high durability.
Apply Polyurethane Without Bubbles
Brush-on polyurethane is common but easy to mess up without the right technique.
Use the Right Brush and Prep
Use natural bristle brushes for oil-based polyurethane and synthetic brushes for water-based. Soak the bristles in mineral spirits (oil) or water (water-based) before use to reduce bubbles. Never use cheap brushes that shed and streak.
Apply Thin, Even Coats
Dip the brush only 1/3 to 1/2 inch deep. Apply with the grain, using back-and-forth strokes to work the finish into the wood. At the end of each stroke, gently pull the bristle tips across the surface to break bubbles.
Work quickly since poly dries fast, especially water-based formulas.
Sand Between Coats
Wait 8-24 hours per manufacturer instructions, then lightly sand with 220-grit (or 320-400 for high gloss). Remove dust with a tack cloth, then apply the next coat.
Two coats are minimum, but three are recommended for tables.
Apply Hardwax Oil Like a Pro
Hardwax oils like Rubio Monocoat are simple to apply but require precision for professional results.
Spread and Buff Immediately
Use a bondo spreader or trowel to push oil into the grain. Cover all six sides of the table, including the bottom and edges, to prevent warping. Buff aggressively with a white floor pad (by hand or with a Gem buffer) for 5-10 minutes, then wipe off ALL excess with cotton rags.
Remember the golden rule: you can’t wipe too much off, but you can leave too much on. Excess oil won’t cure and stays sticky.
Apply a Second Coat (Optional)
For more even sheen or protection, wait 24+ hours, then scuff the surface with a maroon non-woven pad. Apply a thin second coat, buff, and wipe clean.
Cure time is 3 weeks (1 week with accelerator). Avoid heavy use during this period.
Fix Common Finishing Problems
Even experts make mistakes. Here’s how to handle common issues.
Dust Nibs in the Finish
Airborne particles settle during drying and create tiny bumps. Prevent this by working in a clean room and using tack cloth before each coat. Fix by sanding lightly with 320+ grit, wiping clean, and recoating.
Drips or Runs
Too much finish in one area causes drips. Prevent with thin coats. Fix by sanding smooth once dry, then spot-coating.
Bubbles in Polyurethane
Shaking the can, cheap brushes, or over-brushing create bubbles. Prevent by stirring gently, using quality brushes, and soaking bristles before use. Fix by brushing out gently if wet, or sanding and recoating if dry.
Blotchy Stain
Uneven absorption causes blotching. Prevent by sanding evenly and using wood conditioner. Fix by stripping and re-staining.
Prevent Warping With the Six-Sides Rule

Wood expands and contracts with humidity changes. If only the top is finished, moisture enters the unfinished bottom, causing cupping or warping.
Finish All Six Sides
Seal every surface: the tabletop (top and bottom), aprons, and all sides of the legs. This balances moisture absorption and prevents movement.
This step is critical for large tabletops, solid wood construction, and humid environments.
Maintain Your Table for Years
A finish isn’t set-and-forget. Proper care extends its life significantly.
Clean Gently
Use a dry microfiber cloth for daily cleaning. For spills, wipe immediately. For stuck-on grime, use a damp cloth then dry immediately. Use finish-specific soap like Rubio Soap for oil finishes.
Avoid harsh cleaners, ammonia, and vinegar.
Protect the Surface
Use coasters, placemats, and trivets. Never set hot pans directly on oil, wax, or shellac finishes. Use felt pads under lamps or decorative items.
Refresh When Needed
Oil and wax finishes benefit from maintenance oil every 6-12 months to restore sheen and protection. Polyurethane needs no refresh unless damaged. Buff dull areas with a soft cloth or white pad.
Frequently Asked Questions About Finishing a Wood Table
What is the best finish for a dining table?
Polyurethane offers the best protection for dining tables that see daily use. Water-based polyurethane preserves the natural wood color, while oil-based adds warmth. For a natural feel, Rubio Monocoat provides excellent durability with easy spot repairs.
How long should I sand before applying finish?
Sand through a progression from 100-grit to 180 or 220-grit depending on your finish type. Never skip more than one grit between passes. The final grit should be 180 for hardwax oils and 180-220 for polyurethane.
Can I apply polyurethane over oil-based stain?
Yes, but you must wait until the stain is completely dry, typically 24-48 hours for oil-based stains. Some woodworkers prefer to use oil-based products throughout to ensure compatibility, but modern formulations generally allow this combination.
Why is my finish bubbling?
Bubbles come from shaking the can, using cheap brushes, or over-brushing. Stir gently instead of shaking, invest in quality brushes, and soak brush bristles before use. If bubbles appear, brush them out gently while the finish is still wet.
How long does it take for finish to cure fully?
Drying time differs from curing time. Polyurethane dries to the touch in 2-24 hours but takes 7-14 days to cure fully. Hardwax oils like Rubio cure in 3 weeks (1 week with accelerator). Avoid heavy use until fully cured.
Should I finish the bottom of my table?
Yes. Finishing all six sides prevents moisture imbalance that causes warping and cupping. This is especially important for solid wood tables and those in humid environments.
Key Takeaways for Finishing Your Wood Table
Finishing a wood table well requires patience and precision, not speed. Each step builds on the previous one, so skipping steps or rushing creates problems that are difficult to fix later. Sand properly with the correct grit progression, clean thoroughly, and choose a finish matching your table’s use and your maintenance preferences.
Apply thin coats whether using polyurethane or hardwax oil, and always finish all six sides to prevent warping. Test products on scrap wood before committing to your final piece. With proper application and reasonable care, your table will look professional and last for decades.
Ready to start your project? Gather your supplies, test your finish on scrap wood, and take your time through each step. The results are worth the effort.