How to Sand a Table: Quick Steps
Sanding a table is one of the most essential steps in refinishing or preparing wood furniture. Whether you’re restoring an old family heirloom, updating a thrift store find, or building a new piece from scratch, proper sanding ensures a smooth, professional finish that lasts. Skipping or rushing this process can lead to uneven stains, bubbling finishes, and visible scratches, ruining hours of work.
This guide walks you through every phase of how to sand a table, from safety and tool selection to grit progression and final prep for staining or sealing. You’ll learn how to identify your table’s material, avoid common mistakes, and choose the best sanding approach based on your project goals.
Protect Yourself Before Sanding
Sanding generates fine wood particles, loud machinery noise, and flying debris. Protecting your body is non-negotiable.
Essential Safety Gear
Wear an N95 or R95-rated dust mask to prevent inhaling fine wood particles that can cause long-term respiratory issues. Pair this with safety goggles to shield your eyes from flying debris and small splinters.
Use ear protection when operating belt or orbital sanders, as prolonged exposure can damage hearing. Wear long sleeves and tight-fitting clothing, and tie back long hair to avoid entanglement in moving parts.
Work in Ventilated Areas
Work in a well-ventilated space, especially if using chemical strippers. Open windows, use fans, or work outdoors when possible. If working indoors, consider a dust extractor or shop vacuum to reduce airborne particles.
Identify Your Table’s Material
Knowing what your table is made of determines how aggressively you can sand and whether refinishing is even possible.
Solid Wood vs. Veneer vs. Laminate
Solid wood tables can handle aggressive sanding and are ideal for full restoration. You can remove deep stains and old finishes without risk of damage.
Veneer is a thin layer of real wood glued over plywood or MDF. It often shows repeating grain patterns from being rotary-cut from a log. Sand carefully because coarse grits or excessive pressure can burn through the layer, exposing the substrate underneath.
Laminate is a plastic-based coating. Do not sand it. Attempting to sand laminate will destroy the surface and make refinishing impossible.
Check for Intricate Details
Tables with carvings, curves, or intricate edges require more hand work. These areas are hard to reach with power tools and may need mouse sanders or hand sanding blocks.
Clean the Table Before Sanding
Dirt, grease, and old polish must be removed before sanding begins or you’ll grind contaminants into the wood.
Use the Right Cleaner
Wipe down the entire surface with Dawn dish soap, rubbing alcohol, Simple Green, or a grease-cutting laundry detergent. These break down oils and grime that clog sandpaper quickly.
Scrub and Dry Thoroughly
Use a cloth or paper towel to scrub all surfaces, including legs and aprons. Pay special attention to edges and corners where hand oils accumulate. Let the table dry completely before proceeding.
Test a Hidden Spot First
Sand a small area on the bottom of a leg or back edge. This reveals the true wood color beneath the finish and helps you decide where to start in the grit sequence.
Choose the Right Sanding Tools

Matching your tools to the job ensures efficiency, control, and quality results.
Random Orbital Sander for Flat Surfaces
Use a random orbital sander for tabletops and large panels. It moves in tiny circles while oscillating, preventing swirl marks. A mid-range corded model (around $79) offers better power and durability than cheap battery versions.
Belt Sander for Fast Removal
A belt sander removes old finishes and levels uneven wood quickly. It’s aggressive, so use it only for initial stripping and avoid it on veneer. Keep it moving constantly to prevent gouging.
Mouse Sander for Tight Spaces
A mouse sander fits into corners, grooves, and curved edges where larger sanders cannot reach.
Hand Sanding for Detail Work
Use sanding blocks or folded paper for blending, touch-ups, and final smoothing. This approach is essential for edges and transitions between sanded areas.
Connect to Dust Collection
Attach your sander to a shop vacuum or use one with built-in dust collection. Less dust means better visibility, cleaner sandpaper, and healthier air.
Follow the Correct Grit Sequence

Sanding is a step-by-step process where each grit removes scratches from the previous one.
Start Coarse, Finish Fine
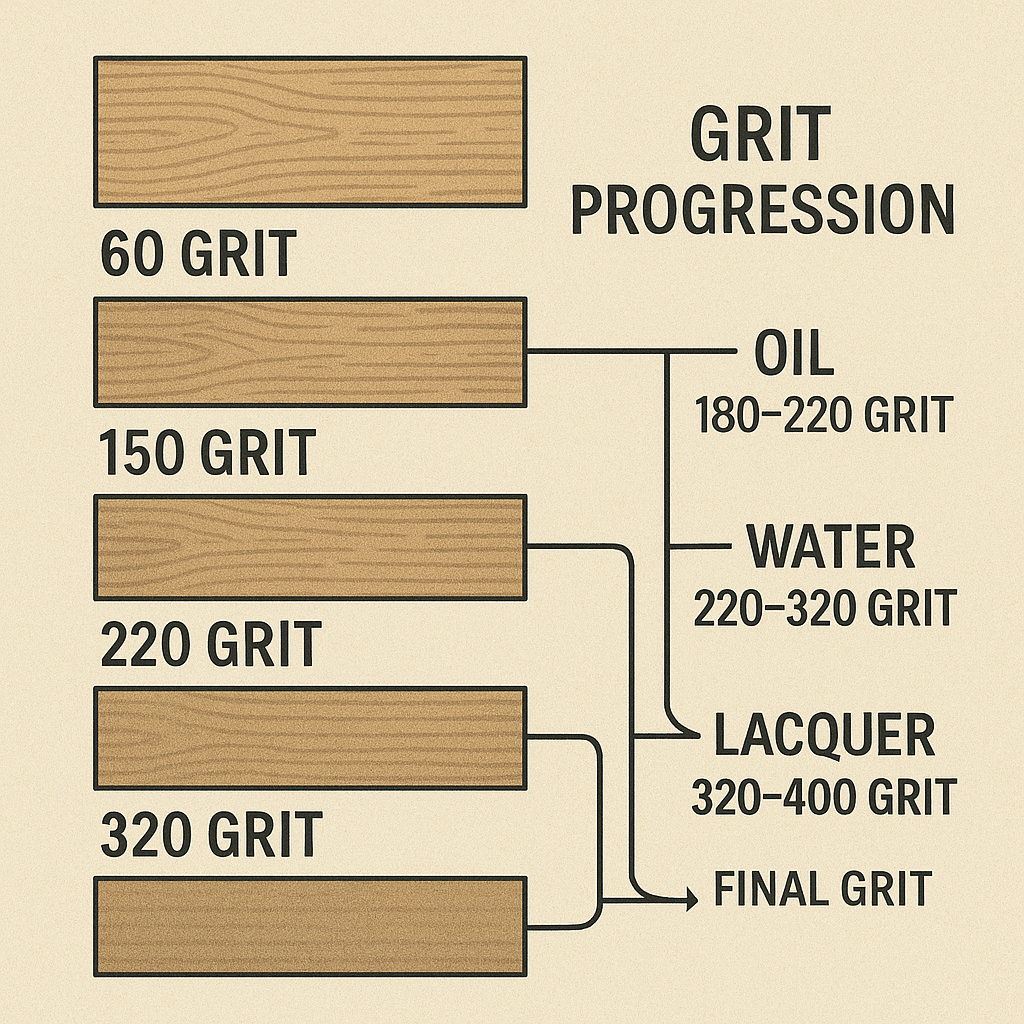
Begin with 60-80 grit to strip old finish or remove deep scratches. Then progress through these stages:
- 100-120 grit to level and smooth
- 150-180 grit for refinement
- 220 grit for final prep
- 320 grit for ultra-smooth finishes on hardwoods
Never Skip Grits
Skipping steps leaves deep scratches that finer paper cannot remove. Each grit should make the surface noticeably smoother before moving to the next.
Adjust for Your Finish Goal
For a rustic look, stop at 120 grit because light sanding marks add character. For a silky-smooth finish, go to 320 grit, especially before oil or high-gloss polyurethane.
Special Case: Veneer Tables
Start at 180 grit if the finish is thin. Avoid coarse grits unless absolutely necessary, and check frequently to avoid burning through the veneer layer.
Sand With the Grain
This is the golden rule of sanding. Never sand against the grain.
Avoid Swirl Marks
Sanding across or perpendicular to the wood fibers creates scratches that are difficult to remove and show up prominently under stain or finish. Always move the sander parallel to the grain direction.
Check Grain Direction on Each Section
Grain runs lengthwise along boards. On tabletops, it usually goes from end to end. On legs or aprons, grain direction may change, so adjust your approach accordingly.
Use Light, Even Pressure
Let the sander do the work. Pressing too hard causes uneven wear, heat buildup, and can damage veneer. Move in smooth, overlapping passes.
Handle Cross-Grain Areas Carefully
Some tables have grain running in multiple directions, like breadboard ends.
Use Chemical Stripper First
On cross-grain joints, avoid aggressive sanding. Strip the finish chemically, then lightly sand with 180 grit or higher.
Hand Sand Transition Zones
Use a mouse sander or hand sanding block with light pressure. Focus on blending rather than removing material. This prevents dips and uneven spots.
Repair Damage During Sanding
Fix imperfections before moving to fine grits for the best final result.
Fill Gaps with Wood Filler
Apply a small amount of wood filler to cracks, dents, or burned-through veneer. Let it dry for 15 minutes, then lightly sand flush with the surface. Don’t over-sand because filler disappears quickly.
Manage Swollen Substrate
If moisture caused swelling under veneer, sand carefully to smooth the bump. Use filler to cover exposed areas, understanding the texture may differ slightly from real wood.
Clean Between Grits and Before Finishing
Dust ruins finishes. Clean thoroughly at every stage.
Remove Debris After Each Grit
After switching to a finer grit, wipe the surface with a damp cloth or tack cloth. This removes coarse particles that could scratch with finer paper.
Final Cleanup Before Staining
After the last sanding pass, follow these steps:
- Blow off dust with a leaf blower or shop vacuum (preferably outdoors)
- Wipe every surface with a tack cloth that grabs microscopic dust
- Check crevices, corners, and undersides thoroughly
Apply the Right Finish
Your sanding effort pays off only if the finish goes on clean and smooth.
Oil Finishes
Penetrating oils like teak, tung, and Danish oil enhance grain and require no topcoat. Apply with a cloth, let soak, then wipe off excess. Can be reapplied later for maintenance.
Stain Application Tips
- Use wood conditioner first on softwoods to prevent blotching
- Apply stain with the grain using a brush or cloth
- To cool a red tone, lightly apply a gray stain over the first coat without letting it soak in
- Sand lightly with 360 grit between stain coats
Sealer and Topcoat
Apply 2 or more coats of polyurethane or polycrylic. Wait 2 hours between coats and cure overnight. Lightly sand with 220-320 grit between coats and clean with tack cloth before each new coat. For a glass-smooth final coat, thin with mineral spirits.
Achieve a High-Gloss Professional Finish
Go beyond basic sealing for a showroom-quality shine.
Wet Sanding for Glass-Like Smoothness
After the final coat dries, use 1000 and 2000 grit wet/dry sandpaper with water and a drop of dish soap. Sand lightly with the grain, avoiding edges where the finish is thinner. The surface will look dull afterward, which is normal.
Polish with Carnauba Wax
After wet sanding, apply a thin layer of carnauba paste wax. Let it haze for 3-5 minutes, then buff with a clean soft cloth using circular motions. This creates a deep, rich luster without harsh chemicals.
Avoid Common Sanding Mistakes

Learn from others’ errors to save time and frustration.
Using the Wrong Grit Sequence
Skipping from 80 to 220 leaves deep scratches that cannot be removed. Always progress gradually through 80, 120, 180, and 220.
Sanding Against the Grain
Creates visible swirls that show under finish. Always check grain direction and follow it.
Ignoring Dust Control
Clogged sandpaper cuts efficiency. Dust trapped under finish causes bumps. Use vacuum attachments and clean between steps.
Over-Sanding Edges
This rounds over sharp edges or creates dips. Keep even pressure and avoid lingering on corners.
Rushing the Process
Sanding takes 2-4 hours for a full dining table. Rushing leads to missed spots and poor results. Take breaks to stay fresh and focused.
Know When to Stop Sanding
Over-sanding wastes time and can damage the wood.
Stop When It Feels Smooth
Run your hand across the grain. It should feel silky with no roughness or resistance. Natural knots should remain untouched.
Stop Before Burning Through Veneer
Check veneer thickness often. If the substrate (MDF or particleboard) shows, you’ve sanded too far.
Stop When Ready for Finish
Once you’ve reached your target grit (220 or 320), stop. Further sanding won’t improve the result and may dull the surface.
Tools and Supplies Cost Breakdown
Plan your budget with realistic pricing.
Essential Costs (If Tools Already Owned)
- Sandpaper bulk box (40-800 grit, 100 sheets): $13.99
- Tack cloths, cleaner, finish: $20 total
Tool Investments
- Mid-range random orbital sander (corded): $79
- Belt sander for heavy jobs: $100+
- 50-pack sandpaper sample set: $20
Total DIY Cost
Approximately $20-$100, depending on tool ownership, which is far less than buying new furniture.
Time and Effort Required
Manage expectations for your project timeline.
Sanding Time
2 to 4 hours for a standard dining table including top, apron, and legs. Longer for carved details or thick finishes.
Total Project Time
1-2 days, including drying times for stain and finish. Wait at least one week before heavy use to allow full cure.
Work in Stages
Sanding is monotonous. Break it into sessions: do the top one day, legs the next. Stay fresh and focused.
Frequently Asked Questions About Sanding a Table
Can I sand a veneer table?
Yes, but with extreme caution. Start at 180 grit and work up to 220 or 280. Avoid coarse grits (40-80) unless stripping, and check frequently to avoid burning through the thin veneer layer.
What grit should I stop at for a smooth finish?
For a standard smooth finish, stop at 220 grit. For a silky-smooth surface before oil or high-gloss finishes, go to 320 grit.
Do I need to sand between coats of finish?
Yes. Lightly sand with 220-320 grit between coats to improve adhesion and smoothness. Always clean with a tack cloth before applying the next coat.
How do I know when I’ve sanded enough?
The surface should feel silky smooth when you run your hand across the grain with no roughness or resistance. If it feels consistent and even, you’re ready for finish.
Can I sand laminate tables?
No. Do not sand laminate. It’s a plastic-based surface that will be destroyed by sanding. Laminate tables cannot be refinished properly.
Key Takeaways for Sanding Your Table
Sanding a table well takes preparation, patience, and precision. Always sand with the grain as this is the single most important rule to prevent permanent damage. Progress through grits sequentially, starting at 60-80 and working up to 220 or 320 depending on your finish goal. Keep everything clean by wiping between grit changes and using a tack cloth before applying finish.
Whether you’re going for rustic charm with a 120-grit stop or a mirror-smooth shine with 320 grit plus wet sanding, the foundation is always great sanding. The 2-4 hours you invest will save you hundreds compared to buying new furniture, and the smooth, beautiful result is worth every minute. Now that you know how to sand a table, your next furniture refinish will look like it was done by a professional.